RSS Feed
  1. CSAs and LocalHarvest.org

    April 23, 2012 by Daniora

    A rainbow of tomatoes

    Tasty cherry tomatoes from our garden.

    This is it. This is the year. This year I’m finally going to sign up for a CSA.

    What’s a CSA? It stands for Community Sponsored Agriculture, and it works sort of like a Kickstarter for farming. Growing vegetables to sell has a high start up cost, and it takes a while before you have any product to sell to start recouping some of those costs. What a CSA allows farmers to do is sell shares to people in the spring, when their spending is high. Then, once the harvests start coming in, those people who purchased shares get a supply of fruits and vegetables every week. It’s like taking care of all of your produce shopping for the season up front.

    CSAs, like farmers’ markets, are growing in popularity. With the return to eating local and in season foods (hooray!), more and more people prefer to get their produce straight from the source rather than something transported in from far away. As a result, they are getting easier to find.

    Enter localharvest.org. This is a fantastic resource that I stumbled upon when searching for a CSA near our soon-to-be new home. You can use it to search for farms, farmers’ markets, CSAs, even online stores and restaurants that serve food made from local ingredients. Each farm in their database has a listing that provides information on the services they offer (CSAs, market days) and even what types of produce they grow and approximately when it is available. This is an especially handy feature for those who aren’t gardeners and are still learning when certain produce is available in their area.

    They also provide contact information for all the farms in case you’ve got questions. I find most farmers are super friendly and more than willing to help you with any questions you have. It’s not just for produce either. A quick search shows that there are meat and seafood CSAs available in addition to the more traditional fruits and veggies. Many also offer things like fresh milk, eggs, and honey. (You all buy local honey, right??!?)

    CSAs vary greatly from one another; some have set produce for each week, some allow you to choose your favorites. Some deliver and some have pick up locations. Be sure to read the listing carefully and ask any questions to make sure that the CSA you choose is the right one for you.

    LocalHarvest.org (also on Facebook and Twitter) is just another example of how using the technology and resources at hand can help you live better. Imagine if all these farms had to rely on word of mouth or flyers and ads in the newspaper. I’m sure they wouldn’t be nearly as successful as they are now. This expansion of the online community has really allowed these smaller growers to be more competitive and offer their superior product to more people in a world previously dominated by factory farms.

    (Speaking of Facebook and Twitter, have you joined The Nerdly Home social network yet? Follow, like, etc. today!)


  2. Ava and Emma’s Quilts

    April 3, 2012 by Daniora

    I would like to apologize for the color quality on the images in this post. I’m not sure what I was thinking when I took these pictures.

    Companion quilts

    Ava and Emma are sisters and two of the most precious little girls on the planet. When I decided to make quilts for them, I wanted to make two that would go together and that would reflect their playful attitudes. Ava is two (almost three!) and Emma is still pretty new, so I wanted to make something kid friendly, but not something they would grow out of in a couple of years. The Moda “Amelia” line was absolutely perfect. Since I wanted the quilts to go together, I chose a pattern from another of my favorite jelly roll books, Two from One Jelly Roll Quilts. I wound up using the same pattern for both quilts, but I swapped out the dominant color; one pink, one blueish purple.

    Emma's Quilt

    Ava's quilt


    Each quilt is made up of a series of nine patch blocks, some with borders, some without, alternating with special blocks designed to make it look like the blocks are overlapping. I was able to make all the nine patch blocks for both quilts at the same time.  Then I made all the other blocks and assembled the quilt tops. My biggest complaint with any of the Lintott jelly roll patterns is that their borders are never big enough. I opted to put a thin black border and a wider colored border to match the dominant color in the quilt. I love the way the black really makes the patterns in the other fabrics pop.

    These are also the first two quilts that I’ve quilted using the longarm machine. My favorite local quilt shop, Bits and Pieces, does machine rentals. You can bring in your quilt and use their machines to quilt it. The fantastic thing is that they have the computer driven machines that you only have to program and it does most of the work for you. This is so fantastic and definitely on the top of my wishlist for when I have way more money and space than I do now. Both quilts have a solid pink backing (cute backing fabric is so hard to find), so I wanted to pick different quilting patterns for each. One has a star pattern and the other has an adorable loopy daisy pattern.

    A loopy daisy pattern I used for one of the quilts.

    I also tried a new binding technique for these quilts. I’m terrible at hand sewing and I don’t trust my stitches to stand up to the kind of wear that I hope these quilts will get. As a result, I’ve been machine sewing all my bindings. The thing is, until these, I’ve been doing it all wrong. I had been sewing the binding to the front, turning it, and then blind sewing it to the back. I always wound up with uneven binding on the back, which I would then hide with a decorative stitch. A little poking around online and I discovered that the way better plan is to stitch the binding to the back of the quilt, fold it to the front and then sew. I did still use a decorative stitch and a variegated thread to make everything just a little cuter.

    Binding stitch with variegated thread.

    I loved making these quilts and I hope my little girlfriends enjoy them for years to come.


  3. Jo’s Knitting Bag

    January 25, 2012 by Daniora

    There’s probably no one that appreciates a handmade gift better than a fellow crafter. This past Christmas, I tried to keep the number of gifts I had to make down from my usual unrealistic goals. I couldn’t help making this kitting bag for my very talented friend Jo.

    Jo's Knitting BagJo, whose amazing work can be seen here, is a fiber artist extraordinaire. She spins, knits, crochets, and now weaves. There is nothing this girl can’t do. It seems like she’s always going off to meet with one group or another or take a class here or there. What better gift could I give her than a bag to carry all her supplies in?

    Given her love of sheep and sheep related products, I figured they would be the obvious choice for fabric for her bag. How happy was I to find knitting sheep along with two awesome coordinating fabrics?

    How cute is this knitting sheep?

    This bag pattern was really great. It’s a ton of pieces, which worried me, but it actually went together really smoothly. It’s got lots of pockets on the outside, and the inside has plenty of space for anything you might want to carry.

    Knitting Bag Lining

    Cute lining fabric with knitting phrases.

    Since giving Jo her bag a couple weeks ago, I’ve received orders for three more in varying fabrics. I guess the bag market might be something I want to look in to.


  4. The joy of washi tape

    January 25, 2012 by Daniora

    It’s no secret that I enjoy wrapping presents almost as much as I enjoy buying them. It’s also no secret that I love cute things from Japan. When browsing around for new and unexpected ways to wrap presents, I came across an article on MartaStewart.com about using washi tape to create your own stripped wrapping paper. A quick hunt for a washi tape source led me to cutetape.com. I could spend millions of hours and thousands of dollars there.

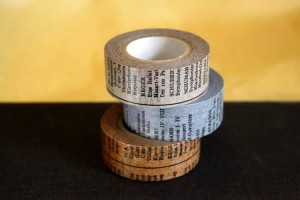
    Some of my favorite washi tape from cutetape.com

    For those not in the know, washi tape is a printed Japanese masking tape made from, of course, washi paper. They come in a variety of widths and patterns. Cutetape.com carries a huge variety at much lower prices that most of the other online distributors. They also carry other packaging items, like bakery twine and hanging tags, and other adorable goodies from Japan. One of my favorite things about Cutetape.com is their variety packs. It’s a great way to get several coordinating rolls rather than trying to pick them out individually.

    In addition to being used for wrapping, there are a ton of other crafts that can be done with washi tape. It can be used on cards and in scrap books, it adds to any paper project, and I’ve even seen flowers made out of strips of washi tape. With the variety of sizes and designs available, there’s no limit to what you can do with it.

    Cutetape.com is running a contest right now for a $100 or $200 shopping spree at their store. My friends, that kind of money buys an awful lot of printed masking tape. Even so, trying to narrow down my choices from the huge Cutetape.com inventory would be almost insurmountable. I think I’d find a way to manage, though.

    Imagine the crafty projects we could embark on together, dear reader, with that kind of resources at our finger tips. I’ve been big into paper quilling lately, and I’ve got a sneaking suspicion that washi tape could lead to some pretty awesome results. Look forward to more washi tape goodies in the future.

    Also, these kitty sticky tabs make me want to die from adorable.

    Zomg, adorable.


  5. A brief word about spices

    January 23, 2012 by Daniora

    Let’s have a little talk about spices and what makes them great. There are so many different herbs and spices out there, and they can be used to add a lot of flavor without adding fat or salt. They are what give different culinary styles and regions their own unique flare. Spices can get pricey, especially for some of the more exotic ones. However, you don’t have to spend a lot to get the most out of your flavorings. One of the biggest indicators of a spice’s taste is freshness.

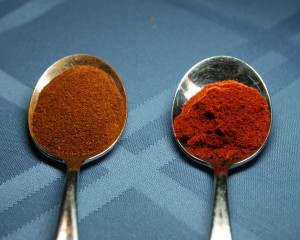
    Allow me to present an example:

    Here are two spoons of paprika. The one on the left is from a jar that is of questionable age and has been stored near the stove. The one on the right is from a freshly purchased jar. They are both McCormick brand paprika from the grocery store, nothing fancy. They were the same price. The only distinction is freshness, and I think the differences are readily noticeable. In addition to their appearance, the new paprika definitely had a stronger aroma and definitely tasted stronger and richer.

    The lesson for today: You can spend a lot of money to buy the highest quality spices and grind them yourself… but you don’t have to. Grocery store spices are perfectly serviceable and delicious. Whether you spend a lot or a little, buy in smaller amounts so that they’ll always be fresh and store them out of direct sunlight and away from heat.


  6. Planting Potatoes: The Finale

    January 20, 2012 by Daniora

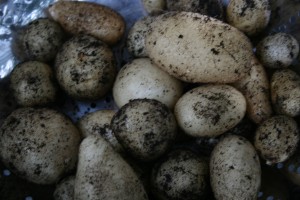
    Freshly harvested potatoes

    When last we left our little potato plants, everything was going rather swimmingly. We were a bit behind schedule but I was getting ready to fold up the top of the bag and add more soil.

    Shortly thereafter, tragedy hit.

    In addition to many other veggies, we grow heirloom tomatoes. They are delicious and exotic looking and really fun to have around. The problem is that they also have lower resistance to disease than the more commercially bred varieties. Sadly, a few of our tomato plants caught something. Their leaves got all yellow and fell off, and in spite of our best efforts, we lost a couple of plants. The other problem was that this blight (or whatever it was) spread to my little potato plants. The smallest of my potato plants died, and the others looked a little sickly.

    I was hesitant to go adding more soil to the bags; I figured since the leaves were a little sad they probably would need all the surface area they could get. Covering any of them would probably hurt the plants in the end. After that, I left them alone until the end of the season. The largest plant got pretty leggy, and probably would have sent out quite a few new shoots had I covered the stem with soil like I was supposed to.

    Plants ready for harvest.

    Plants ready for harvest.

    This fall was really warm, so I let the plants stay in the grow bag for as long as possible. When the weather threatened to get chilly, I figured it was time to harvest and see what we had gotten.

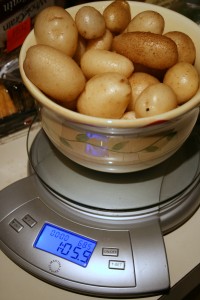
    Almost a pound and a half of potatoes.

    Almost a pound and a half of potatoes.

    Considering all the problems that I encountered during this experiment, I think we got quite a bit of yield. We wound up with almost a pound and a half of varying sized potatoes (though none as large as they were supposed to be). The picture below shows all my little potatoes with a ruler so you can see what we got. A few of the potatoes had scaly skin which is completely benign, it just makes the potatoes less attractive.

    Potatoes with ruler.

    We wound up eating these potatoes in a batch of kale soup. They were delicious. This was pretty great learning experience. I think I’ll give growing potatoes in the grow bag another shot this year. I’ll be sure to keep them away from the tomatoes this time.


  7. Resolutions

    January 13, 2012 by Daniora

    New Year’s Resolutions. They can be hard to make and are harder to keep. We’re two weeks into the year, and I’m sure most of us who made resolutions have already broken at least one. Case in point: This post was supposed to be done two weeks ago.

    That being said, the new year is a good excuse to start doing new things in your life. I think people inherently like deadlines and due dates. New Year’s is the perfect universal start date. So here are a few resolutions that I think we should all try and keep. These aren’t the usual “I will lose 15 pounds” or “I will take the dog for a walk every day”. These are more general resolutions that will help make life better for all of us.

    1. Try something new.  It’s so easy to get stuck in a rut. Everyone is so busy these days, falling back on “the old standbys” is a quick and easy solution. We’ve also developed into a society that is totally opposed to mistakes and failure. To combat this, we should all try something new at least once a week. It can be a new food, a new recipe, or a new hobby. Our local technical school has a large variety of classes from auto repair to cooking that meet once or twice a week for a few weeks. They are very reasonably priced and are a great way to try your hand at something new. It’s fine if you wind up not enjoying it or if it turns out to be a complete disaster; even negative experiences help enrich our lives. Besides, you might find there are a lot of awesome things that you didn’t even know you enjoyed.

    2. Read labels. It could be on your food, your clothing, or your new mattress. Wherever it is, give the label a read. Make sure you know what you’re eating, how to wash your clothes, or how not to remove this tag under penalty of law. Labels have a lot of useful information that you might not have known. I think this is especially eye opening on food packages. The number of sneaky, not good for you, extra ingredients or the number of servings that are really in that little bag of chips can be alarming. That doesn’t mean you can’t eat them, but reading the label will make you more aware of what you are eating.

    3. Read instructions. This goes hand in hand with number two. The instructions will not only tell you the right way to do things, they can also tell you about features you didn’t even know you had access. I find this to be especially true when installing new software or playing with a new piece of hardware. If I have a good idea of how something works, I’ll usually just plow ahead and get right to work. Eventually, I’ll need to look something up in the manual and find out that there were easier ways to do things all along. I am all too familiar with the phrase “I didn’t know it could do that”.

    4. Use the right tool. We don’t own a set of dry measuring cups. The fact that my baking adventures turn out as well as they do in spite of this is a testament to the quality of the recipes I’m using. While I do take Alton Brown’s stand of not having a lot of one function tools around, having the proper tools for what you’re doing will make everything easier and faster with a greater chance of success. When you’re done using the proper tools, put them back where they belong. You’ll be less likely to reach for the wrong tool if the right one is easily accessible.

    5. Back things up. I don’t take pictures with a film camera anymore. Most people don’t. As a result, every precious photographed memory I have from the last six or so years is stored as little bits of data on a hard drive. This is a scary situation. Almost everything else on my computer can be reacquired or reloaded. My pictures are irreplaceable.  The only solution is to back them up. I regularly back all my photos up on an external hard drive and hope to add a second cloud storage back up in the near future. The double back up ensures that your files will be safe and sound should anything happen to your computer.

    6. Finish things. I am totally awesome at starting projects. Just ask my husband. I am slightly less awesome at finishing them. I think part of the problem is that every project I start working on spawns ideas for more things to do. I get so excited about these new projects that the original ones get put aside. So this year, I’m going to try and finish some of them. I’ll probably still have multiple things going at once, but at least I’ll have more entering that “finished” pile than going into the huge boxes of “work in progress”.

    7. Take a tech break. I adore technology and gadgets. I also know that I spend way too much time using them. So this year I’m going to try and take a break more often, and I hope you’ll join me. Read a book, make something by hand, play a board game with friends. We don’t have to all become hermits living in a shack in the woods, but we can put our smart phones down for a little while.

    8. Make things by hand or from scratch. So, back on resolution two you read the labels and saw all the extra stuff in the food you eat. So why not try making some of it from scratch? You don’t have to make everything from scratch, but there are plenty of things that are easy to make and actually wind up better tasting and better for you than store bought. Salad dressing is a prime example of this. It’s super fast and easy to make and turns out better than anything you’d buy in a bottle. Whipped cream is way better made from scratch and homemade marshmallows, while a bit more of a challenge, are out of this world. Making other things by hand is a great way to get into that trying new things bit we talked about earlier and it makes you appreciate just how much work goes into every day things.

    9. Support artisans and craftspeople. Let’s face it; there are a lot of things we’re not going to make ourselves. For those things, why not get them from an artisan or a local source rather than factory made? I love farmers’ markets for jam and jelly and sometimes baked goods. Etsy is a great source for handmade stuff; there’s a lot of crap on there, but there’s a lot of really awesome handicrafts too. Maybe you make jelly and a friend bakes bread. Why not start a barter system? I traded a shirt for the Renaissance Faire that I made to a friend who is knitting me fingerless gloves. Trading with others is a great way for you do get something you need by doing something you enjoy.

    10. Take care of yourself. I know, I know, I said this wouldn’t be the “lose 15 pounds” kind of list. Let’s face it, though. We all get so caught up in all of our everyday stuff that we don’t always do what’s best for our minds and bodies. So this year, fix that. Get some sleep. Eat well. Get a little fresh air and sunshine. Take five minutes to decompress and relax. Enjoy your food.

    There you have it. Ten things we can all do this year to make 2012 the best year yet.


  8. Finding Patterns

    September 23, 2011 by Daniora

    Finding Patterns

    Great patterns can come from almost anywhere.

    With both Halloween and Christmas right around the corner, this is one of my busiest crafting times of the year. When making stuff to sell, you generally have to make your patterns from scratch, but when making gifts for others, finding a pattern that suits your needs can be a huge time saver. There are plenty of places around the web that can help you get your hands on these patterns quickly and cheaply.

    1. Simplicity, McCalls, and Butterick: Unless I’m in a bind, I’ll only buy these patterns when they’re on sale for one or two dollars at my local Joann Fabrics. However, looking around online can help you make a shopping list for the sale. These usually occur on the weekends, and the pattern books can be crowded. If you’ve got a list of pattern numbers, you can skip the browsing and head straight to the pattern drawers. These patterns are great for costumes, clothing, and some gift items like bags or purses. These site also sell a variety of supplies and notions that can be hard to find at your local fabric store.

    Note: I generally don’t use any patterns from Vogue. They tend to be overly complex and don’t usually go on sale. Vogue also carries very few patterns for the type of items I make.

    2. Etsy: This is one of my new favorite places to look for inexpensive and unique patterns. They’ve got everything from sewing and quilting to knitting and crochet. Many of them are available as PDF downloads and will arrive in your email inbox within a few hours of your purchase.  This instant gratification allows you to get to the crafting faster. Another added benefit is that many pattern designers allow you to use their patterns to make things to sell, at least in limited quantities. Etsy is also a great place to find out-of-print patterns from the larger companies. These are usually pricier, and you have to make sure the listing states that it is uncut and complete.

    3. Moda Bake Shop, Connecting Threads, Freespirit Fabric: These are three great places to find free quilt patterns. They are available as downloadable PDFs that can be printed when you need them. In addition to traditional quilt patterns, there are also a variety of quilted gifts including stockings, bags, and these adorable floor pillows. If you have a favorite fabric line, be sure to check out their website. Many fabric designers also put out free patterns that they feel will best showcase their prints.

    4. Books: There are an endless number of books devoted to any craft you can think of. Most contain instructions or patterns that you can copy. It’s easy to wind up with a large pile of these books, so check and see if your local library has any books on the subject. While brand new fiction books can be hard to get your hands on at the library, the crafting section is usually well stocked. To top it off, most libraries have copy machines, so you can get your patterns copied before you even get the book home.

    A larger number of crafting books are also becoming available as e-books. One of the nice things about this format is that they are easy to carry, easy to store, and you don’t have to figure out how to hold the book open while you’re working. If you don’t have an e-reader that does color, however, you might want to skip this format; many of these books lose a lot when only in black and white.

    5. Magazines: I especially love special issues of magazines, like those devoted to special holidays or one particular craft. Some of my favorite special issues come from Martha Stewart and Better Homes & Gardens. The best specialty crafting magazines tend to be available at large bookstores and craft stores, but I’ve even picked up some great ones while waiting in line at the grocery store. The benefit to a magazine over a book is that they tend to be less expensive and have a wider variety of projects. They’re a great introduction when you’re getting into something new. These will also include patterns, often as a pull out section on a special pattern paper, no need for copying.

    6: Google: It’s amazing the results you can get just by Googling the pattern you’re looking for. I’ve had great success with things like “Free Stocking Pattern” or “Plush Bunny Pattern”. You might have to refine your search as you go, specifying whether you’re looking for a sewing pattern or one for crochet or knitting, but you can almost always be guaranteed good results. Google is also really great for solving any problems you might be having.  Starting your search with “How do I” can often find the answer you’re looking for in the first couple of links. Don’t be afraid to use too many words in your search; you can always remove some if you’re not getting the results you’re after. The internet is full of blogs and sites dedicated to the hobbies people love, and they are almost always willing to share their knowledge and experience with you.

    Searching for instructions and patterns online is a great way to kick start your projects and often save you time and money as well. Start saving your favorite free patterns today!


  9. Old Fashioned Apple Crisp

    September 16, 2011 by Daniora

    I hadn’t really intended to do another recipe post this week. When I woke up to a perfect autumn day and a bag of freshly picked apples, I knew a crisp was in the cards for today.

    Apple Crisp

    In general, I don’t really like pie crust.  When buying pies from the local orchard, I always get crumb topped and, more often than not, the bottom crust of my serving gets thrown away. As a result, apple crisp is one of my favorite fruit goodies.

    The fantastic thing about this recipe is that you can adapt it to suit your needs. If your apples are really sweet, you can decrease the amount of sugar in the filling. You can alter the spices if you like. You can leave out the cloves or decrease the amount of cinnamon. I’ve even been known to add a dash of ginger when I’m feeling a little exotic. The warm spices and zesty citrus guarantee delicious results even when using less than perfect apples. Plus, the topping has oatmeal in it; that makes it a breakfast food, right? Right?

    Old Fashioned Apple Crisp

    Filling:

    • ● 5 pounds McIntosh or Macoun apples
    • ● Grated zest of 1 orange
    • ● Grated zest of 1 lemon
    • ● 2 tablespoons freshly squeezed orange juice
    • ● 2 tablespoons freshly squeezed lemon juice
    • ● 1/2 cup granulated sugar
    • ● 2 teaspoons ground cinnamon
    • ● 1 teaspoon ground nutmeg
    • ● 1/2 teaspoon ground cloves


    For the topping:

    • ● 1 1/2 cups flour
    • ● 3/4 cup granulated sugar
    • ● 3/4 cup light brown sugar, packed
    • ● 1/2 teaspoon kosher salt
    • ● 1 cup oatmeal
    • ● 1/2 pound cold unsalted butter, diced


    1. Preheat the oven to 350° F. Butter a 9 by 14 by 2-inch baking dish.
    2. Peel, core, and cut the apples into large wedges. Combine the apples with the zests, juices,
      sugar, and spices. Pour into the dish.
    3. To make the topping, combine the flour, sugars, salt, oatmeal, and cold butter in the bowl of an electric mixer fitted with the paddle attachment. Mix on low speed until the mixture is crumbly and the butter is the size of peas (this can also be done by hand). Scatter evenly over the apples. Dust lightly with a pinch of cinnamon.
    4. Place the crisp on a sheet pan and bake for 1 hour until the top is brown and the apples are
      bubbly. Serve warm (with whipped cream or vanilla ice cream, if desired).

  10. Grilled chicken wings

    September 14, 2011 by Daniora

    In honor of the first weekend of the regular football season, we’re going to talk about one of the quintessential football snacks: chicken wings.

    Grilled chicken wings

    Cooking chicken wings without using a deep fryer is a time consuming and intensive process.  There’s a lot you have to do to make sure that the skin winds up crispy. Until recently, I followed Alton Brown’s method of first steaming the wings and chilling them uncovered in the refrigerator before roasting them in the oven. It’s a process that takes hours and hours, but ultimately you wind up with good results.

    This summer, I decided that we should try grilling the wings. Our local market, Butcher Boy, has marinated wings for sale, as well as big bags of plain wings. I picked up a package of teriyaki marinated wings for our first experiment. Those first results were a little hit and miss.

    The biggest problem we encountered was that there were a lot of flare ups on the grill from the chicken skin, and we didn’t have a spray bottle of water handy.  A rookie mistake, I know, but most of our other grilling hasn’t really required this sort of preparation. The second problem was that the wings stuck to the grill, especially with the marinade on it.  The flavor of the finished wings was good, but the teriyaki flavor really got lost.

    Grill Flare Up

    A spray bottle is a necessity to keep flare ups under control.

    Our second attempt yielded much better results. We started with plain wings, got some Pam for grilling and liberally sprayed down the grill before cooking, and coated the wings in sauce after cooking. Something about the char from the chicken mixing with the sauces really added a new level of flavor to the wings. I made two types of sauces, Alton Brown’s orange glazed wings and a basic buffalo (see below). Both were outstanding on the crispy skin (even though the char did turn the buffalo sauce a sort of muddy brown color).

    Grilling wings is still a fair amount of work.  It takes constant vigilance to combat flare ups and make sure that all the little wings get crispy and don’t stick to the grill.  It is, however, much faster than the steam-and-roast method and has much better results. Depending on the size of your grill, it can be a great way to cook up food for a large crowd.

    Basic Buffalo Sauce

    I’m not a huge fan of  very spicy buffalo wings. I avoid anything with the words “volcano” or “atomic”. I like them to have a bit of heat, but still retain a depth of flavor. You can substitute any hot sauce of your choice and increase the amount to your desired heat level.

    • 3 ounces unsalted butter
    • 1 small clove garlic, minced
    • 1/4 cup hot sauce (I prefer Frank’s)
    • 1/2 teaspoon kosher salt


    1.  Melt the butter in a small bowl along with the garlic.
    2. Pour melted butter and garlic, along with hot sauce and salt, into a bowl large enough to hold all of the chicken and stir to combine.
    3. Remove the wings from the grill and toss with the sauce. Serve warm with a side of blue cheese dressing if desired.


    As the season progresses, stay tuned for lots more football snacks and party ideas.