RSS Feed

Posts Tagged ‘crafts’

  1. Typographic Art

    November 21, 2013 by Daniora

    IMG_7705

    They say that a picture is worth a thousand words. There are times, though, when a dozen or so words can make a very pretty picture.

    Typographic art is very popular these days. And for good reason. Text based art is can be adapted to any style, mood, or theme. It can be painted, a decal, or framed. It’s also really easy to do yourself. I used Photoshop for my own text art project, but even something as simple as Word will work. There are lots of great resources for free fonts, dafont.com being my favorite. If you’re one of those people with lovely handwriting or someone who does calligraphy, you can make them by hand instead of producing them digitally.

    Commercially made text prints and vinyl decals are readily available just about anywhere that sells home goods or framed art. There are also plenty available on Etsy, either as prints or as downloadable files you can print yourself.  With just a little time and some creativity, though, you can put together your own text art that will perfectly suit your specific taste and needs.

    My kitchen is a hallway. It’s a long, thin room with a pretty awkward wall at the far end. That wall was empty for months after we moved in. I thought for a while that I would try and create some sort of window type of wall art, since the kitchen lacks any openings other than the doorway. I tried finding something that would suit my needs, but nothing seemed quite right. I also ran into the added challenge of having to choose something that wouldn’t be too obtrusive since the sink is right against the wall. The last thing I needed was to hang something that we would knock off the wall every time we did the dishes.

    IMG_7704

    Then I wound up with a pile of frames from a yard sale. There were four matching 8×10 black frames. I decided they would fit perfectly in the space that I had to work with. It was then just a question of finding something to put into them.

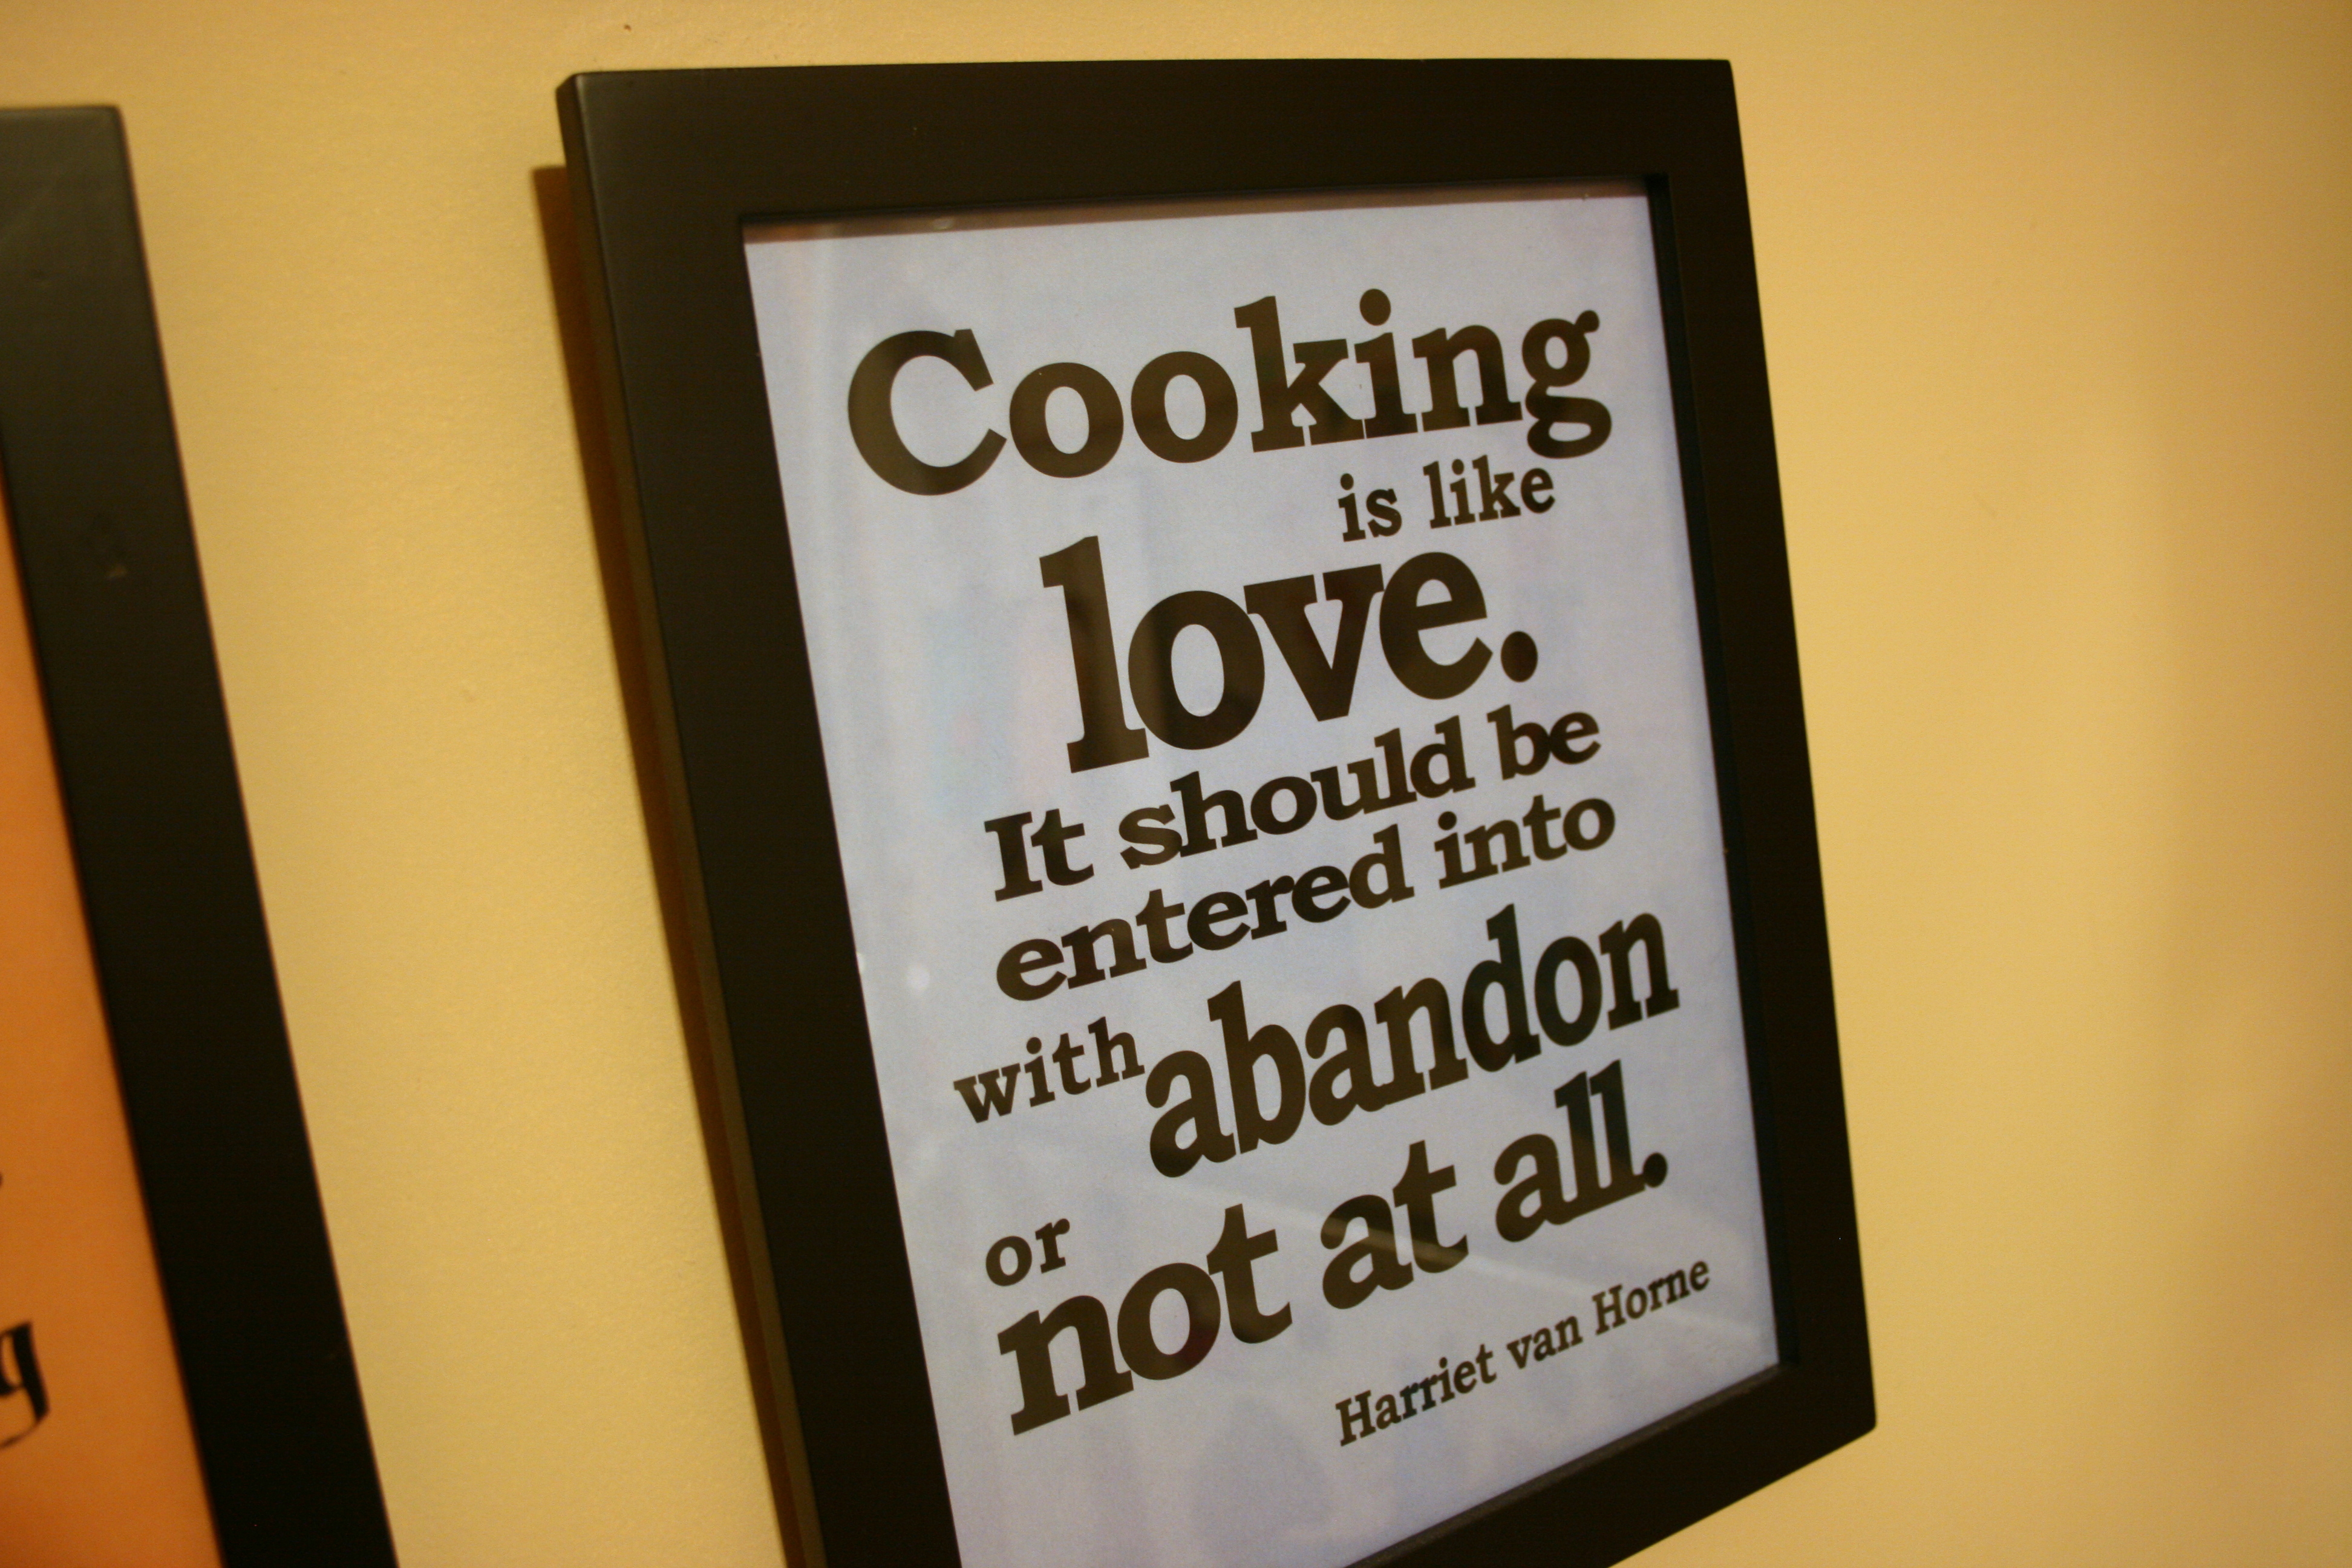
    I thought at first that some food-based photographs or illustrations would work. Again, I scoured the internet, but I didn’t find anything that really caught my attention. When I was browsing on Etsy, I did find a few posters that were typographic art of quotes regarding food. I liked them, but none really fit my needs, and I couldn’t find four that went together.

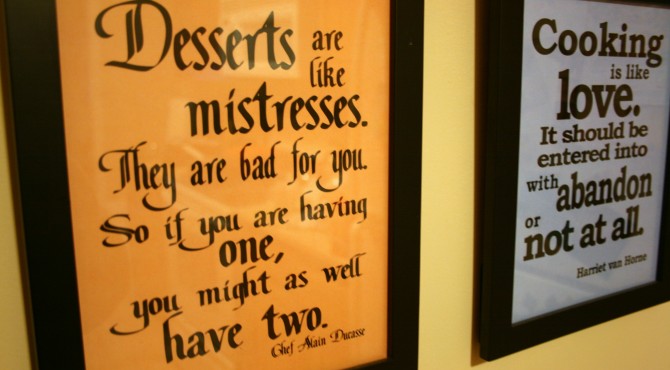
    Well, this art degree has to be good for something. I sat down to find quotes about food and cooking that fit my personality. A quick Google search yielded more results than I could handle. I had to pare it down to four, content in the fact that when I got bored with these, I could always swap them out for new ones.  It was then a fairly simple matter of choosing fonts and arranging the words in a pleasing manner. I added colored backgrounds, y’know, for color. One could just as easily put the text over a stock photo or something with a little more interesting than a plain color field, but this worked better for my purposes.

    Once I was happy with the way they looked, I took the file down to my local Staples to have them printed on card stock. I could have printed them at home, but having them printed out had a couple advantages. The first was that with a colored background I’d be using a TON of very expensive ink. A color print on card stock usually runs about $1. Secondly, with large fields of color like these, I find laser printing generally looks a lot smoother. All I had to do then was trim them out, frame them up, and hang them.

    The finished product.

    The finished product.

    Of course, hanging them is easier said that done. I know, they’re not perfectly even. Then tend to not hang perfectly straight. In spite of that, I adore them. They’ve been up for almost a year and I have not yet felt compelled to change out the quotes yet, so I must have chosen well.

    As a bonus, here’s the file of the prints that hang in my kitchen. Feel free to use them yourself!

    Additional bonus. Kinetic typography is a thing. There are videos. I adore them. Here’s one all about words.


  2. My Autumn Wreath

    November 12, 2013 by Daniora

    IMG_7624

    Apologies for the fuzzy iPhone photos. In my determination to get this project completed, I neglected to photograph it as well as I should have.

    Since my Halloween wreath is still sitting about 90% finished next to my crafting table, I was determined to get my Thanksgiving one up in a more timely manner.

    I wanted something autumnal but not specifically Thanksgiving. I needed something that I could put up for more than a few weeks.  I went browsing around the web and found this precious yarn and felt argyle wreath on Etsy. In my typical fashion, I thought “Hey, I can make that.”

    Let me start by saying that I don’t think I’ll be making another yarn wrapped wreath any time soon. It. Took. Ages.

    ArgyleWreath

    The difficulty was compounded by the fact that I used a flat ring wreath form instead of a round one. So I’d be going along, wrapping the yarn nicely and then realize that, because the outer circumference is larger than the inner one, that my wrapping was no longer straight. So then I’d have to do this weird wedge backtrack wrapping thing to try and straighten it back out again. Nonsense.

    Once I got the wreath form wrapped, it was time to put the argyle pattern together. I measured out a diamond that I thought would look good and started cutting them out of the two colors of felt. I wasn’t worried about filling the entire space since I was making my little felt owl who would cover any gap in the pattern.  Once the diamonds were glued down, I used a dark purple yarn to crisscross over them completing the argyle.

    ArgyleWreath1Then it was on to the decorations. I found a pattern for a felt owl over at Bugs and Fishes. He went together pretty fast. Then it was just a matter of putting together a few quick felt flowers (another tutorial I’ll have to do in the future) and viola! A wreath. On my door. In time for the holiday!

    How shiny is the paint on our door? Holy cow

    How shiny is the paint on our door? Holy cow.

    Wreaths are one of those things I have come to love about having a place of our own. Wreaths and door mats. The rest of the house may be a disaster a lot of the time, but my front door is always inviting.


  3. Finding Patterns

    September 23, 2011 by Daniora

    Finding Patterns

    Great patterns can come from almost anywhere.

    With both Halloween and Christmas right around the corner, this is one of my busiest crafting times of the year. When making stuff to sell, you generally have to make your patterns from scratch, but when making gifts for others, finding a pattern that suits your needs can be a huge time saver. There are plenty of places around the web that can help you get your hands on these patterns quickly and cheaply.

    1. Simplicity, McCalls, and Butterick: Unless I’m in a bind, I’ll only buy these patterns when they’re on sale for one or two dollars at my local Joann Fabrics. However, looking around online can help you make a shopping list for the sale. These usually occur on the weekends, and the pattern books can be crowded. If you’ve got a list of pattern numbers, you can skip the browsing and head straight to the pattern drawers. These patterns are great for costumes, clothing, and some gift items like bags or purses. These site also sell a variety of supplies and notions that can be hard to find at your local fabric store.

    Note: I generally don’t use any patterns from Vogue. They tend to be overly complex and don’t usually go on sale. Vogue also carries very few patterns for the type of items I make.

    2. Etsy: This is one of my new favorite places to look for inexpensive and unique patterns. They’ve got everything from sewing and quilting to knitting and crochet. Many of them are available as PDF downloads and will arrive in your email inbox within a few hours of your purchase.  This instant gratification allows you to get to the crafting faster. Another added benefit is that many pattern designers allow you to use their patterns to make things to sell, at least in limited quantities. Etsy is also a great place to find out-of-print patterns from the larger companies. These are usually pricier, and you have to make sure the listing states that it is uncut and complete.

    3. Moda Bake Shop, Connecting Threads, Freespirit Fabric: These are three great places to find free quilt patterns. They are available as downloadable PDFs that can be printed when you need them. In addition to traditional quilt patterns, there are also a variety of quilted gifts including stockings, bags, and these adorable floor pillows. If you have a favorite fabric line, be sure to check out their website. Many fabric designers also put out free patterns that they feel will best showcase their prints.

    4. Books: There are an endless number of books devoted to any craft you can think of. Most contain instructions or patterns that you can copy. It’s easy to wind up with a large pile of these books, so check and see if your local library has any books on the subject. While brand new fiction books can be hard to get your hands on at the library, the crafting section is usually well stocked. To top it off, most libraries have copy machines, so you can get your patterns copied before you even get the book home.

    A larger number of crafting books are also becoming available as e-books. One of the nice things about this format is that they are easy to carry, easy to store, and you don’t have to figure out how to hold the book open while you’re working. If you don’t have an e-reader that does color, however, you might want to skip this format; many of these books lose a lot when only in black and white.

    5. Magazines: I especially love special issues of magazines, like those devoted to special holidays or one particular craft. Some of my favorite special issues come from Martha Stewart and Better Homes & Gardens. The best specialty crafting magazines tend to be available at large bookstores and craft stores, but I’ve even picked up some great ones while waiting in line at the grocery store. The benefit to a magazine over a book is that they tend to be less expensive and have a wider variety of projects. They’re a great introduction when you’re getting into something new. These will also include patterns, often as a pull out section on a special pattern paper, no need for copying.

    6: Google: It’s amazing the results you can get just by Googling the pattern you’re looking for. I’ve had great success with things like “Free Stocking Pattern” or “Plush Bunny Pattern”. You might have to refine your search as you go, specifying whether you’re looking for a sewing pattern or one for crochet or knitting, but you can almost always be guaranteed good results. Google is also really great for solving any problems you might be having.  Starting your search with “How do I” can often find the answer you’re looking for in the first couple of links. Don’t be afraid to use too many words in your search; you can always remove some if you’re not getting the results you’re after. The internet is full of blogs and sites dedicated to the hobbies people love, and they are almost always willing to share their knowledge and experience with you.

    Searching for instructions and patterns online is a great way to kick start your projects and often save you time and money as well. Start saving your favorite free patterns today!


  4. Needle Felting

    April 26, 2011 by Daniora

    I believe that the first time I ever saw anything needle felted was on an episode of the Martha Stewart show.  It looked so simple and fun, and I was completely taken in by the old “here’s one I prepared earlier” trick.  This is definitely something I’ve wanted to try for a while.

    Things are never as easy as they seem on tv.  As far as this craft goes, however, it’s not all that far off.  It’s certainly going to take a bit of practice to get things right, but I think that my first attempts have turned out better than expected.

    The art of needle felting involves taking bits of unspun wool roving, making it into shapes, and repeatedly stabbing it with a special needle.  The needle has little barbs along the edges that help tangle the fibers together into one felted piece. I shudder to think what would happen if you stabbed yourself with said needle. In order to build a 3d felted object, you make multiple pieces and join them together (with more stabbing) and add details with tiny bits of roving.  It’s really very entertaining and the repeated stabbing is quite relaxing.

    For this first attempt I had a book in hand, but I’ll admit that I didn’t really read the instructions.  I mostly looked at the pictures for guidance.  Secondly, we had a bit of a hard time finding the supplies at any of our local stores.  There are certainly plenty of online retailers who will set you up with everything you need to begin needle felting, but for those of us seeking instant gratification, things are a bit trickier.  I did try my local yarn and fiber store.  While they had plenty of wonderful things, they did not have the supplies I was looking for.  We eventually found everything we needed at a Joann Fabrics.

    Needle felting supplies

    Supplies in hand, I set up shop at the table and started working on what would eventually turn out to be a sheep. Actually, I started out hoping to make a rabbit, but after I completed the body portion I realized that it looked nothing like a rabbit. It did, however, look somewhat like the body of a sheep.  I went along with it. Keeping the roving in the shape you want is really tricky in the beginning.  It’s very soft and silky and can get out of hand quickly.  The other problem I had was tucking in the ends of the pieces of roving. They kept sticking out at crazy angles and were tricky to catch with the needle.

    Beginning the needle felting process

    Beginning the needle felting process.

    This looks nothing like a rabbit.

    This looks nothing like a rabbit.

    Looking more like a sheep.

    Looking more and more like a sheep.


    Getting the legs right was the hardest part.  You’re working with a pretty small amount of roving, trying to make it as stable as possible while also trying desperately not to stab your fingers with the needle.  In the end, I wound up making two long pieces that were pretty firm in the middle and cutting it in half.  The other tricky part is making sure that you don’t over felt before you join pieces together.  There has to be some loose fibers on one section that you can felt into the other. Once I got all the main pieces together, I added the smaller parts like ears and a tail.  For a finishing touch, I sewed seed beads on for eyes and added a small bell with a ribbon.  I have to say, I’m really pleased with the finished product.

    The finished wool lamb.

    The finished wool lamb.

    As I said, I’m really excited to have gotten such a good result on a first try. I’m looking forward to playing with this stuff a bit more.  If you want to check out some pretty awesome and non-traditional needle felted projects, check out this page on Deviant art.  Crazy good. (And thanks to Jo for the link!)