RSS Feed

Posts Tagged ‘birthday’

  1. Gluten-Free Chocolate Peanut Butter Cupcakes

    December 14, 2013 by Daniora

    IMG_7711

    You may have discovered by now, dear readers, that I am a fan of celebrations. Any excuse to gather people together, have good food, and generally promote warm and fuzzy feelings is fine by me. Recently, it was our store manager’s birthday. While working retail may not be my ideal situation, I at least have the advantage of working in a place where we all feel like family. So there was no way this occasion was going to pass by unmarked.Edit

    Here’s the catch: He’s gluten-free.

    I’m not one to panic about such obstacles. I was, however, determined to make something outstanding. I’ve cooked for vegetarians, vegans, diabetics, and people with nut allergies (fortunately, not all at the same time). Adding a few gluten free recipes to my repertoire wouldn’t be bad. Chocolate and peanut butter are his favorites, so I went looking for something.

    Flourless chocolate cake is a popular option for going gluten free. My problem with this is that it tends to be super rich and heavy. Not ideal for a casual mid-afternoon in-the-breakroom celebration. I really wanted cupcakes.

    Fortunately, I stumbled onto this recipe from Chocolate & Carrots. It had all the qualities I was looking for. Perfect. Alright, here we go…

    Gluten-Free Chocolate Peanut Butter Cupcakes


    Ingredients

    • 1 (15.5 oz) can of reduced sodium black beans, drained and rinsed


    Wait, what? Did I read that right? Yes, yes I did. Okay, okay, no one panic. I mean, beans in desserts aren’t entirely unprecedented. There are Chinese red bean cakes, for example. ::deep breath:: Alright, I’m sure these will be good. Let’s just keep going and see where this all goes.

    Gluten-Free Chocolate Peanut Butter Cupcakes


    Ingredients

    • 1 (15.5 oz) can of reduced sodium black beans, drained and rinsed
    • 4 eggs
    • 1 tablespoon vanilla extract
    • 5 tablespoons unsalted butter, or coconut oil
    • 3/4 cup cane sugar
    • 5 tablespoons special dark cocoa powder
    • 1 teaspoon baking powder
    • 1/2 teaspoon baking soda
    • 12 Reese’s Peanut Butter Cups, unwrapped


    1. Preheat oven to 350°.
    2. Line a 12 cup muffin pan and spray with cooking spray.
    3. Blend the beans, 2 eggs, vanilla and sugar in the food processor (or blender) on high until completely blended.
    4. In a small bowl combine the cocoa powder, baking powder and baking soda.
    5. In a large bowl, beat the butter/coconut oil until fluffy.
    6. Add the remaining two eggs and beat well after each egg.
    7. Beat in the bean mixture.
    8. Beat in the dry ingredients.
    9. Beat for 1-2 minutes.
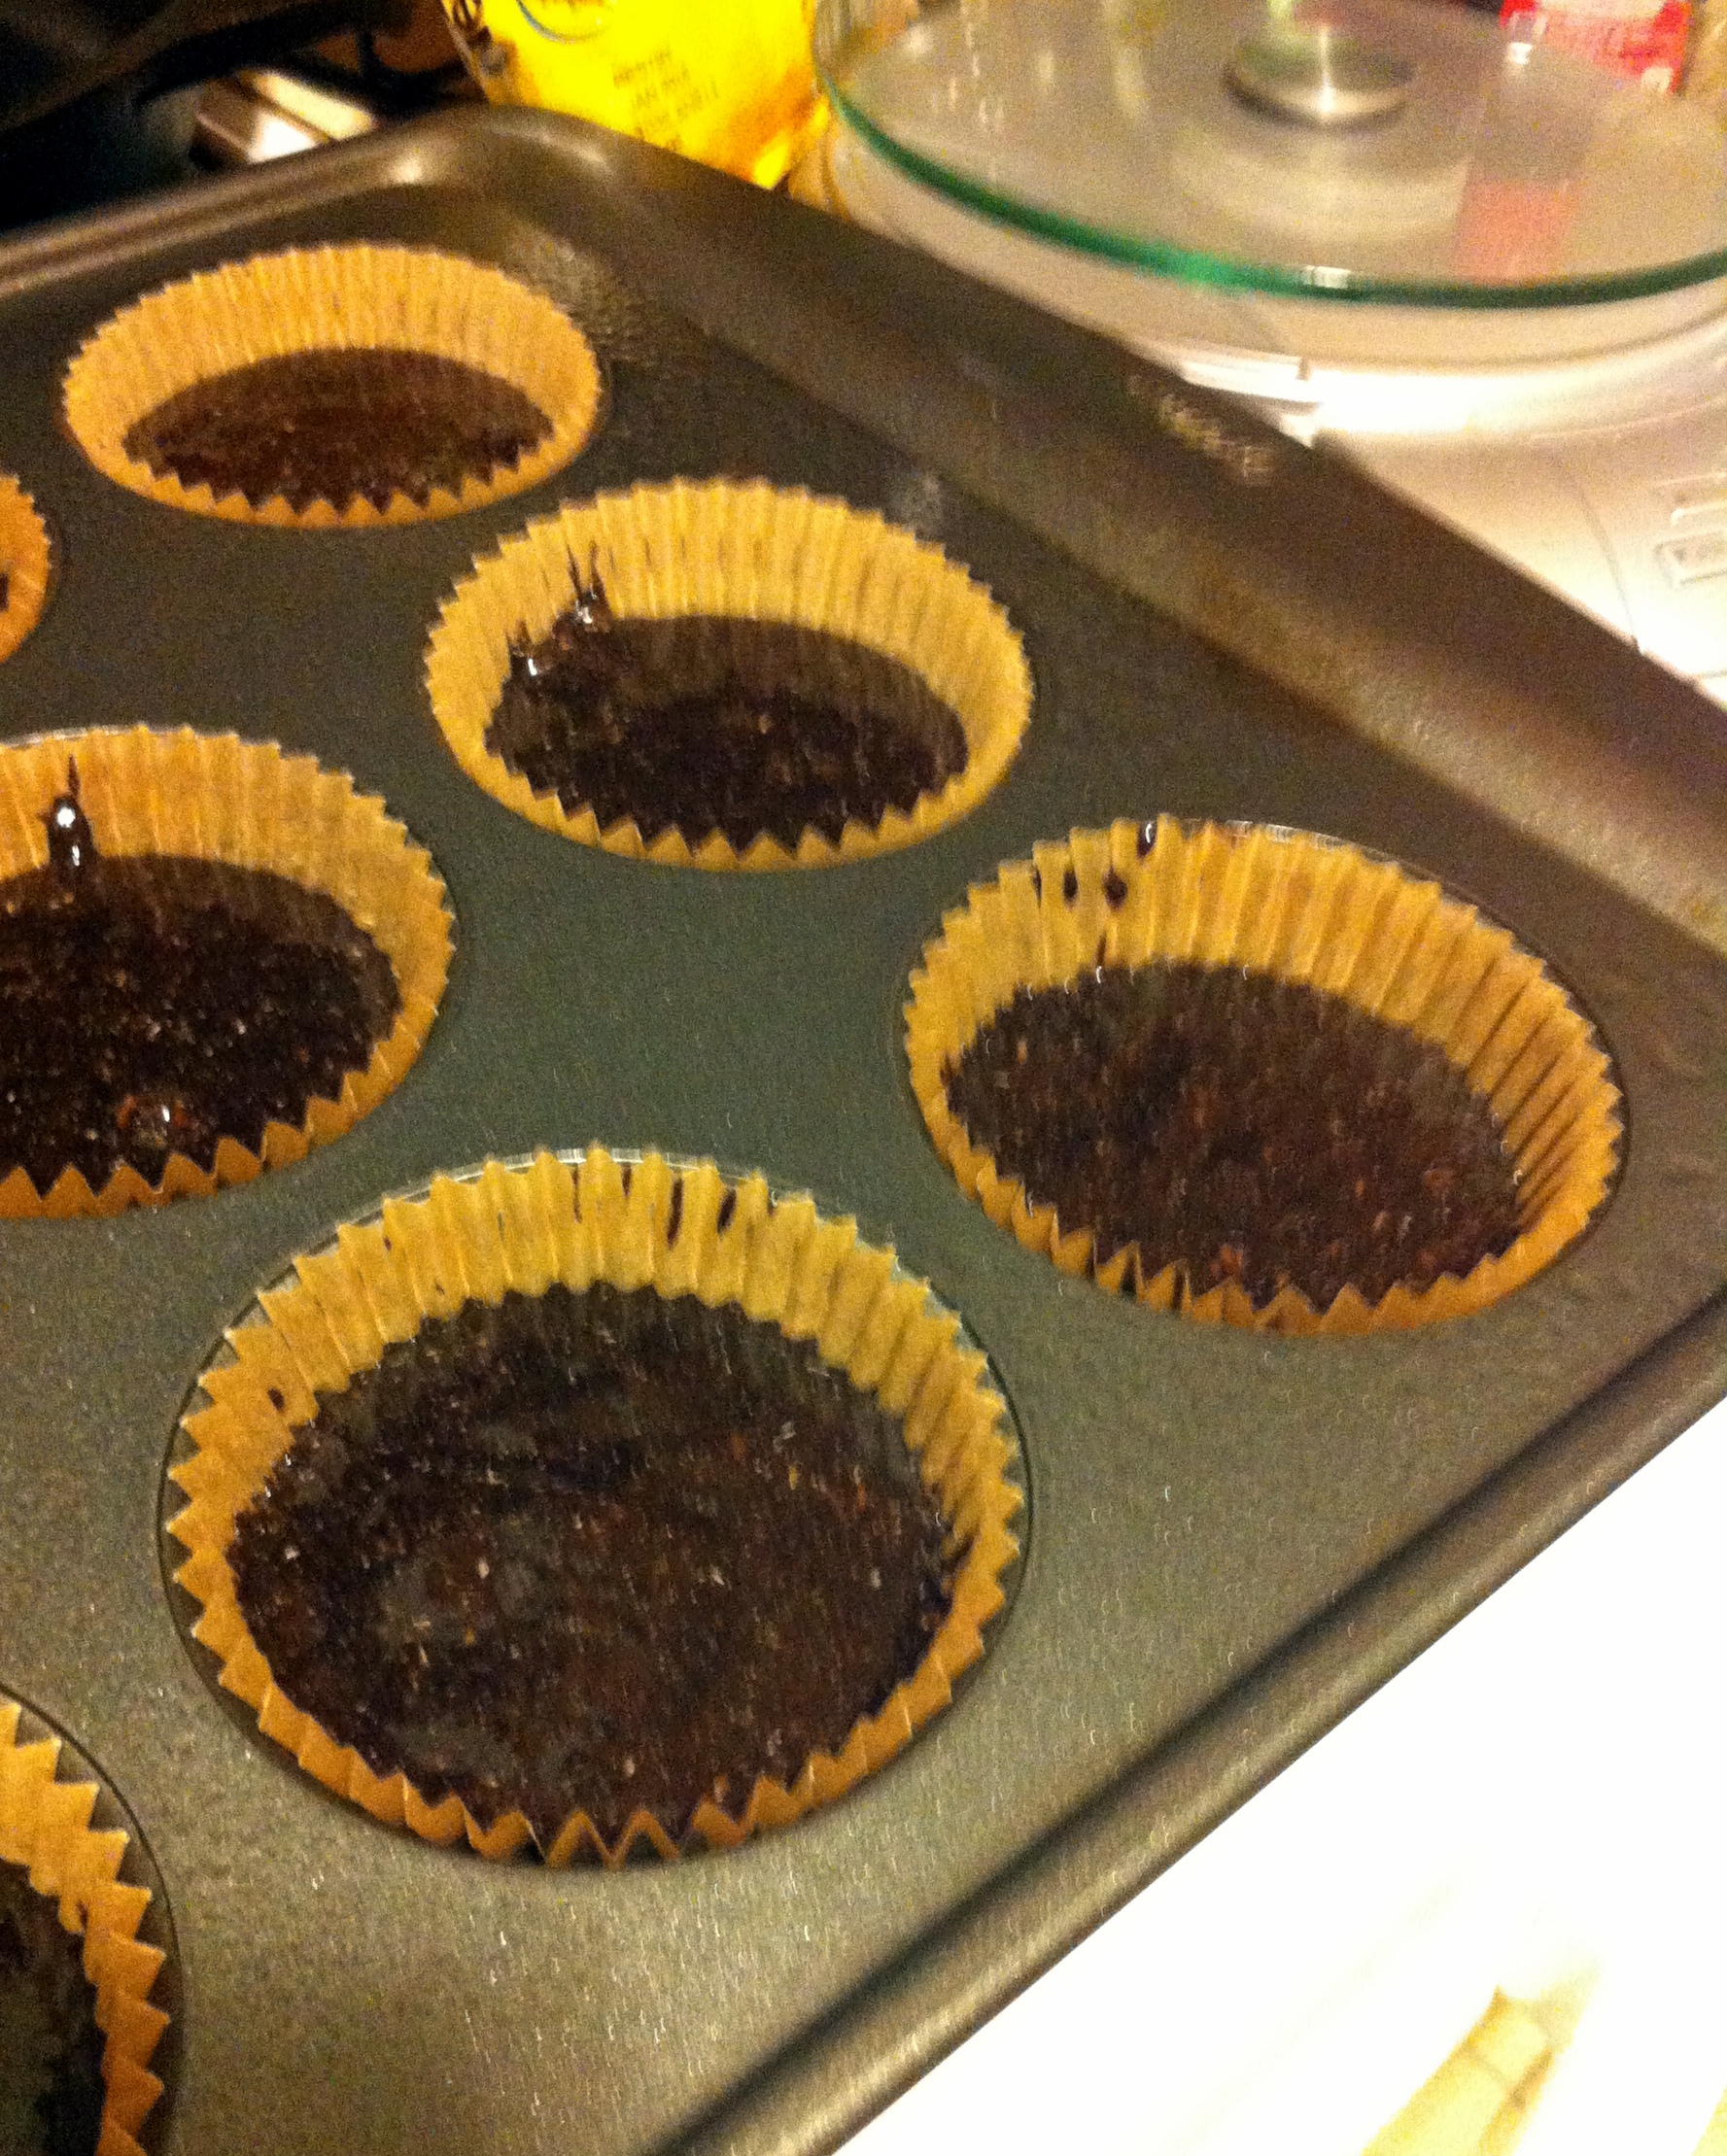
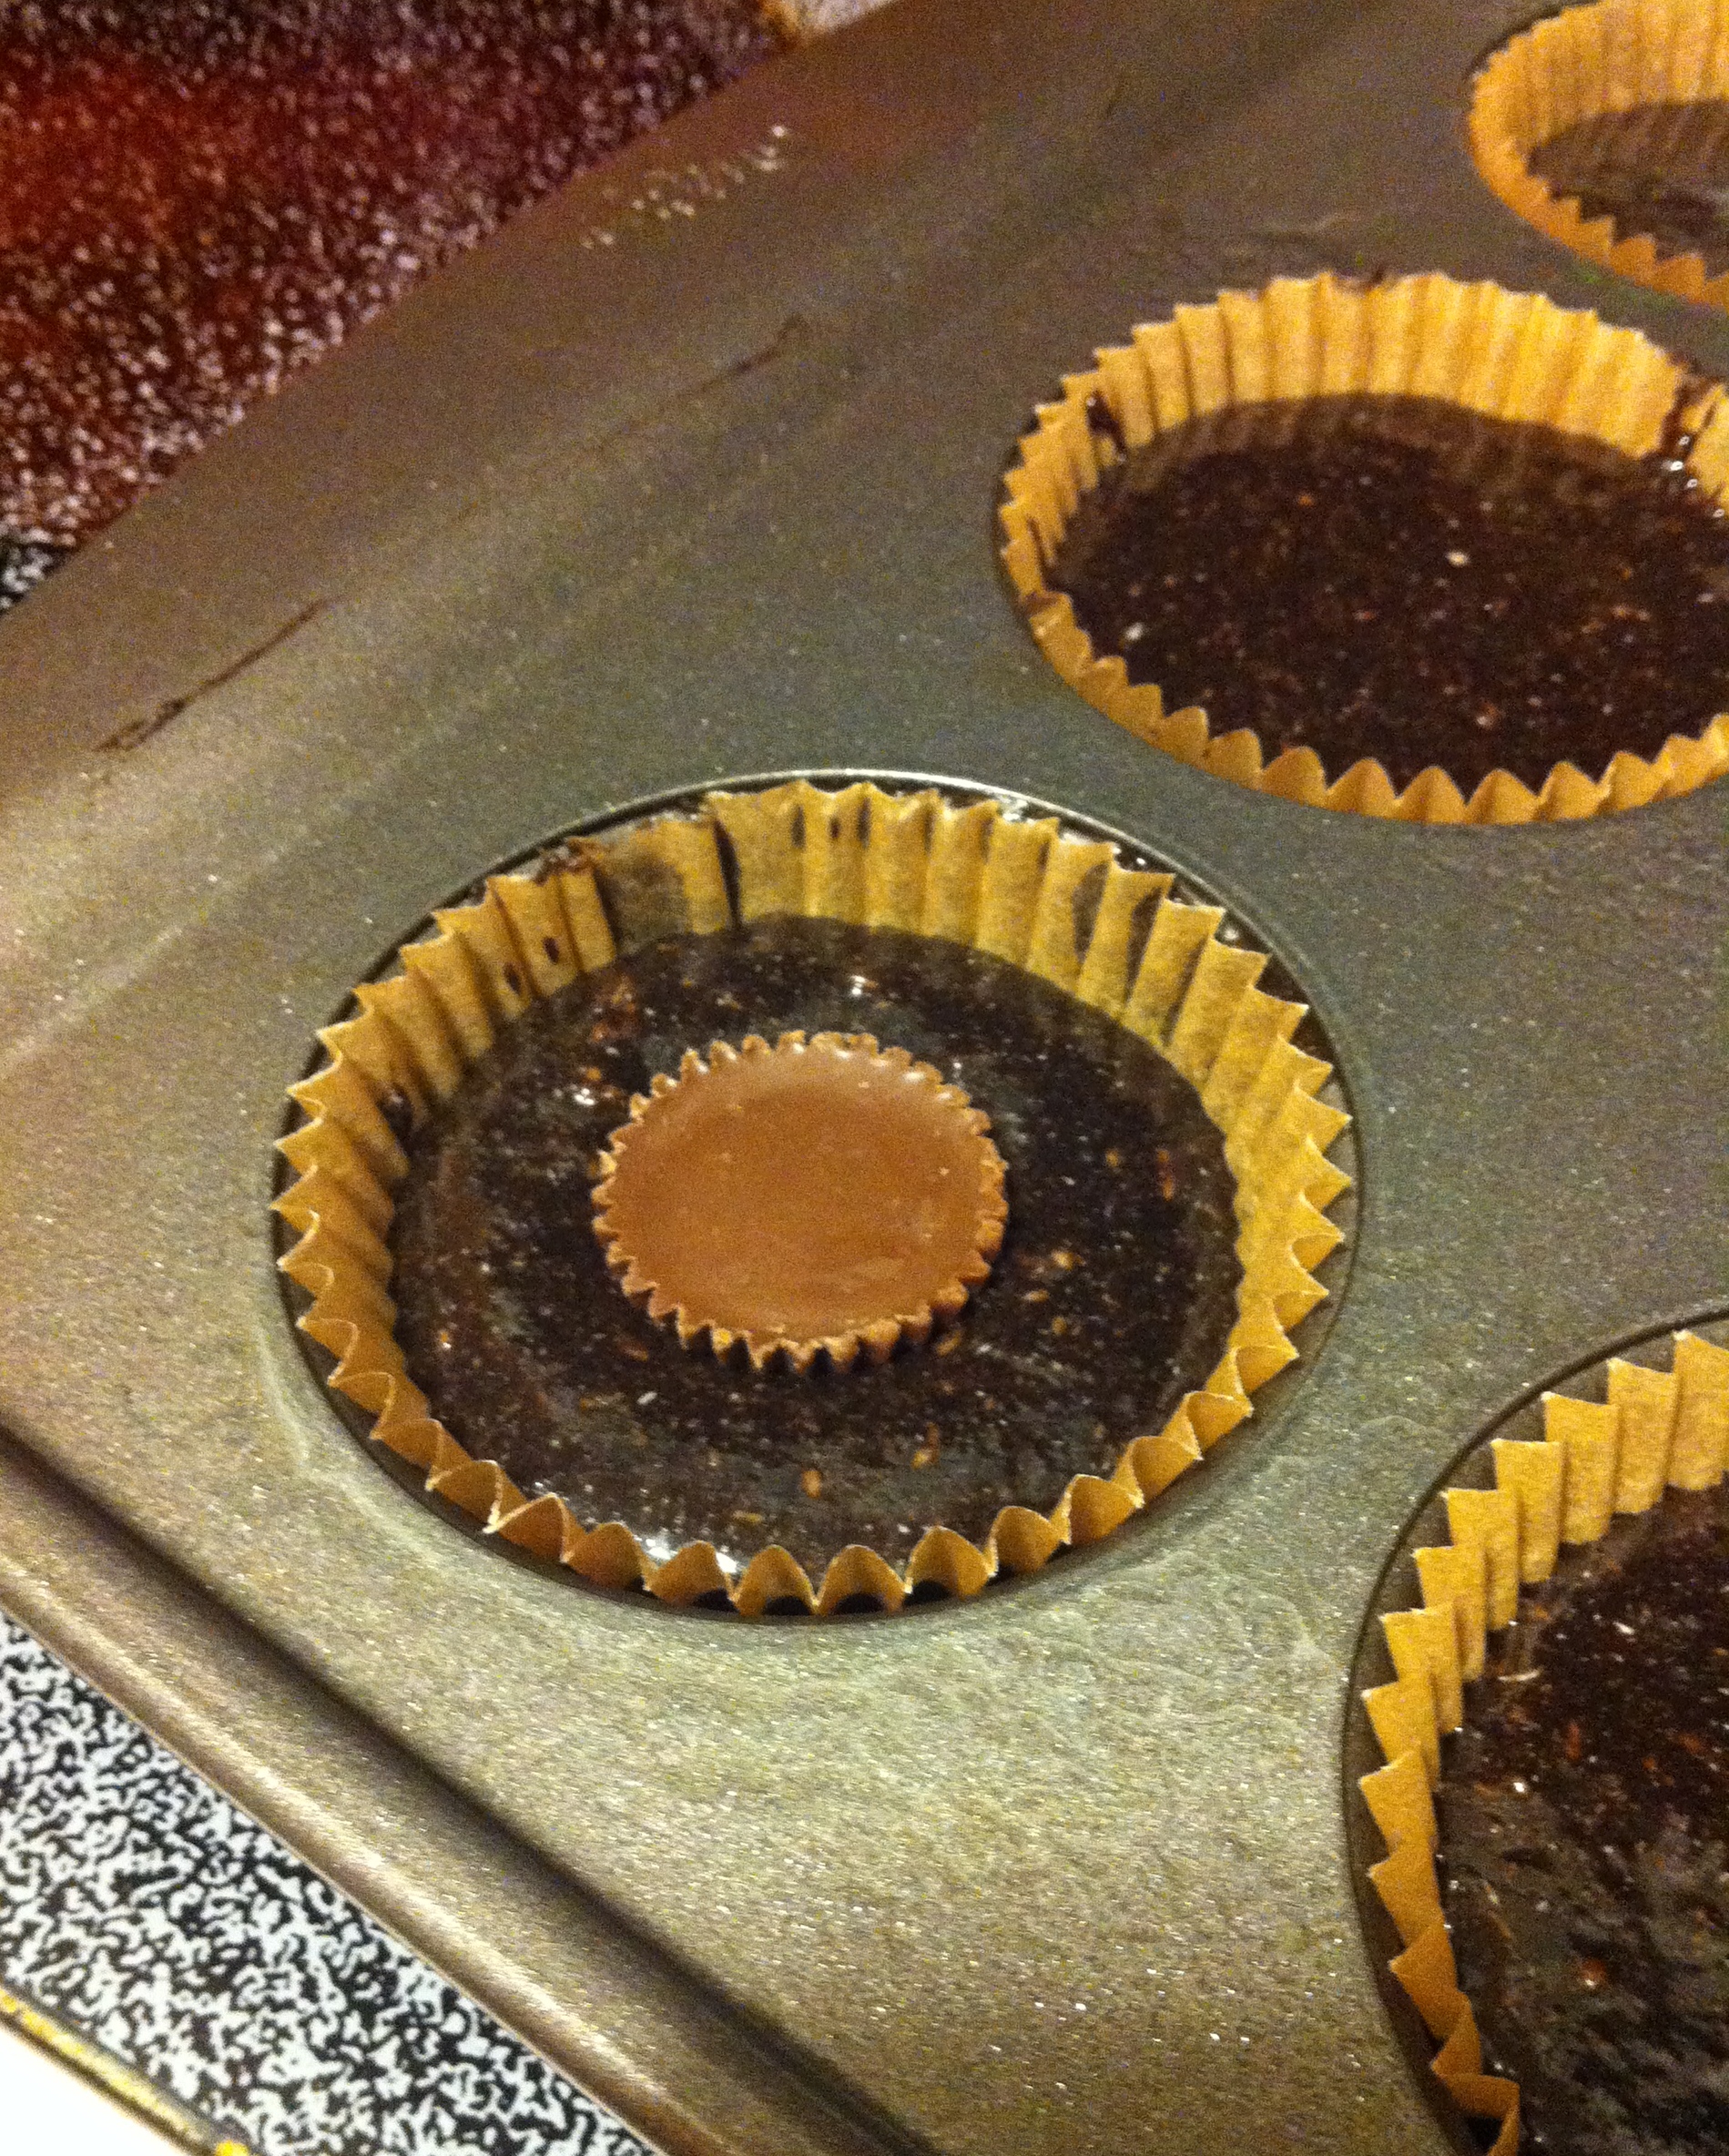
    10. Pour the batter into the prepared pan and place a Reese’s cup on the top.
    11. Bake for about 20-25 minutes until the cupcakes are cooked completely.
    12. Allow them to cool completely before icing.


    Peanut Butter Frosting

    Ingredients

    • 1 cup creamy peanut butter
    • 5 tablespoons unsalted butter, softened
    • 2 cups powdered sugar
    • 1/2 – 2/3 cup whipping cream (heavy cream)
    • 12 miniature Reese’s Peanut Butter Cups
    1. Beat the peanut butter, butter and powdered sugar until combined.
    2. Add in the whipping cream and beat until light and fluffy.
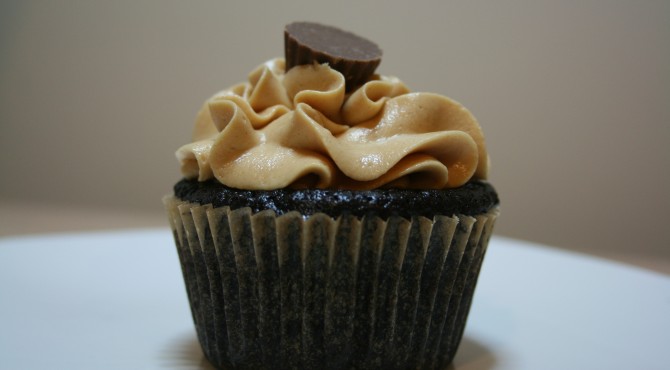
    3. Use a piping bag with your favorite decorating tip and decorate the cupcakes or use a knife and spread to decorate the cupcakes.
    4. Decorate with a mini Reese’s Peanut Butter Cup.


    Okay, not going to lie, the whole beans-eggs-sugar concoction in the food processor was kinda gross looking. I did my best to press on and finish the batter. When it was all together, it looked and smelled like cupcake batter. I was starting to feel better about things.

    IMG_3685

    Then, I added the mini peanut butter cups. This really made me feel better about things.
    IMG_3686
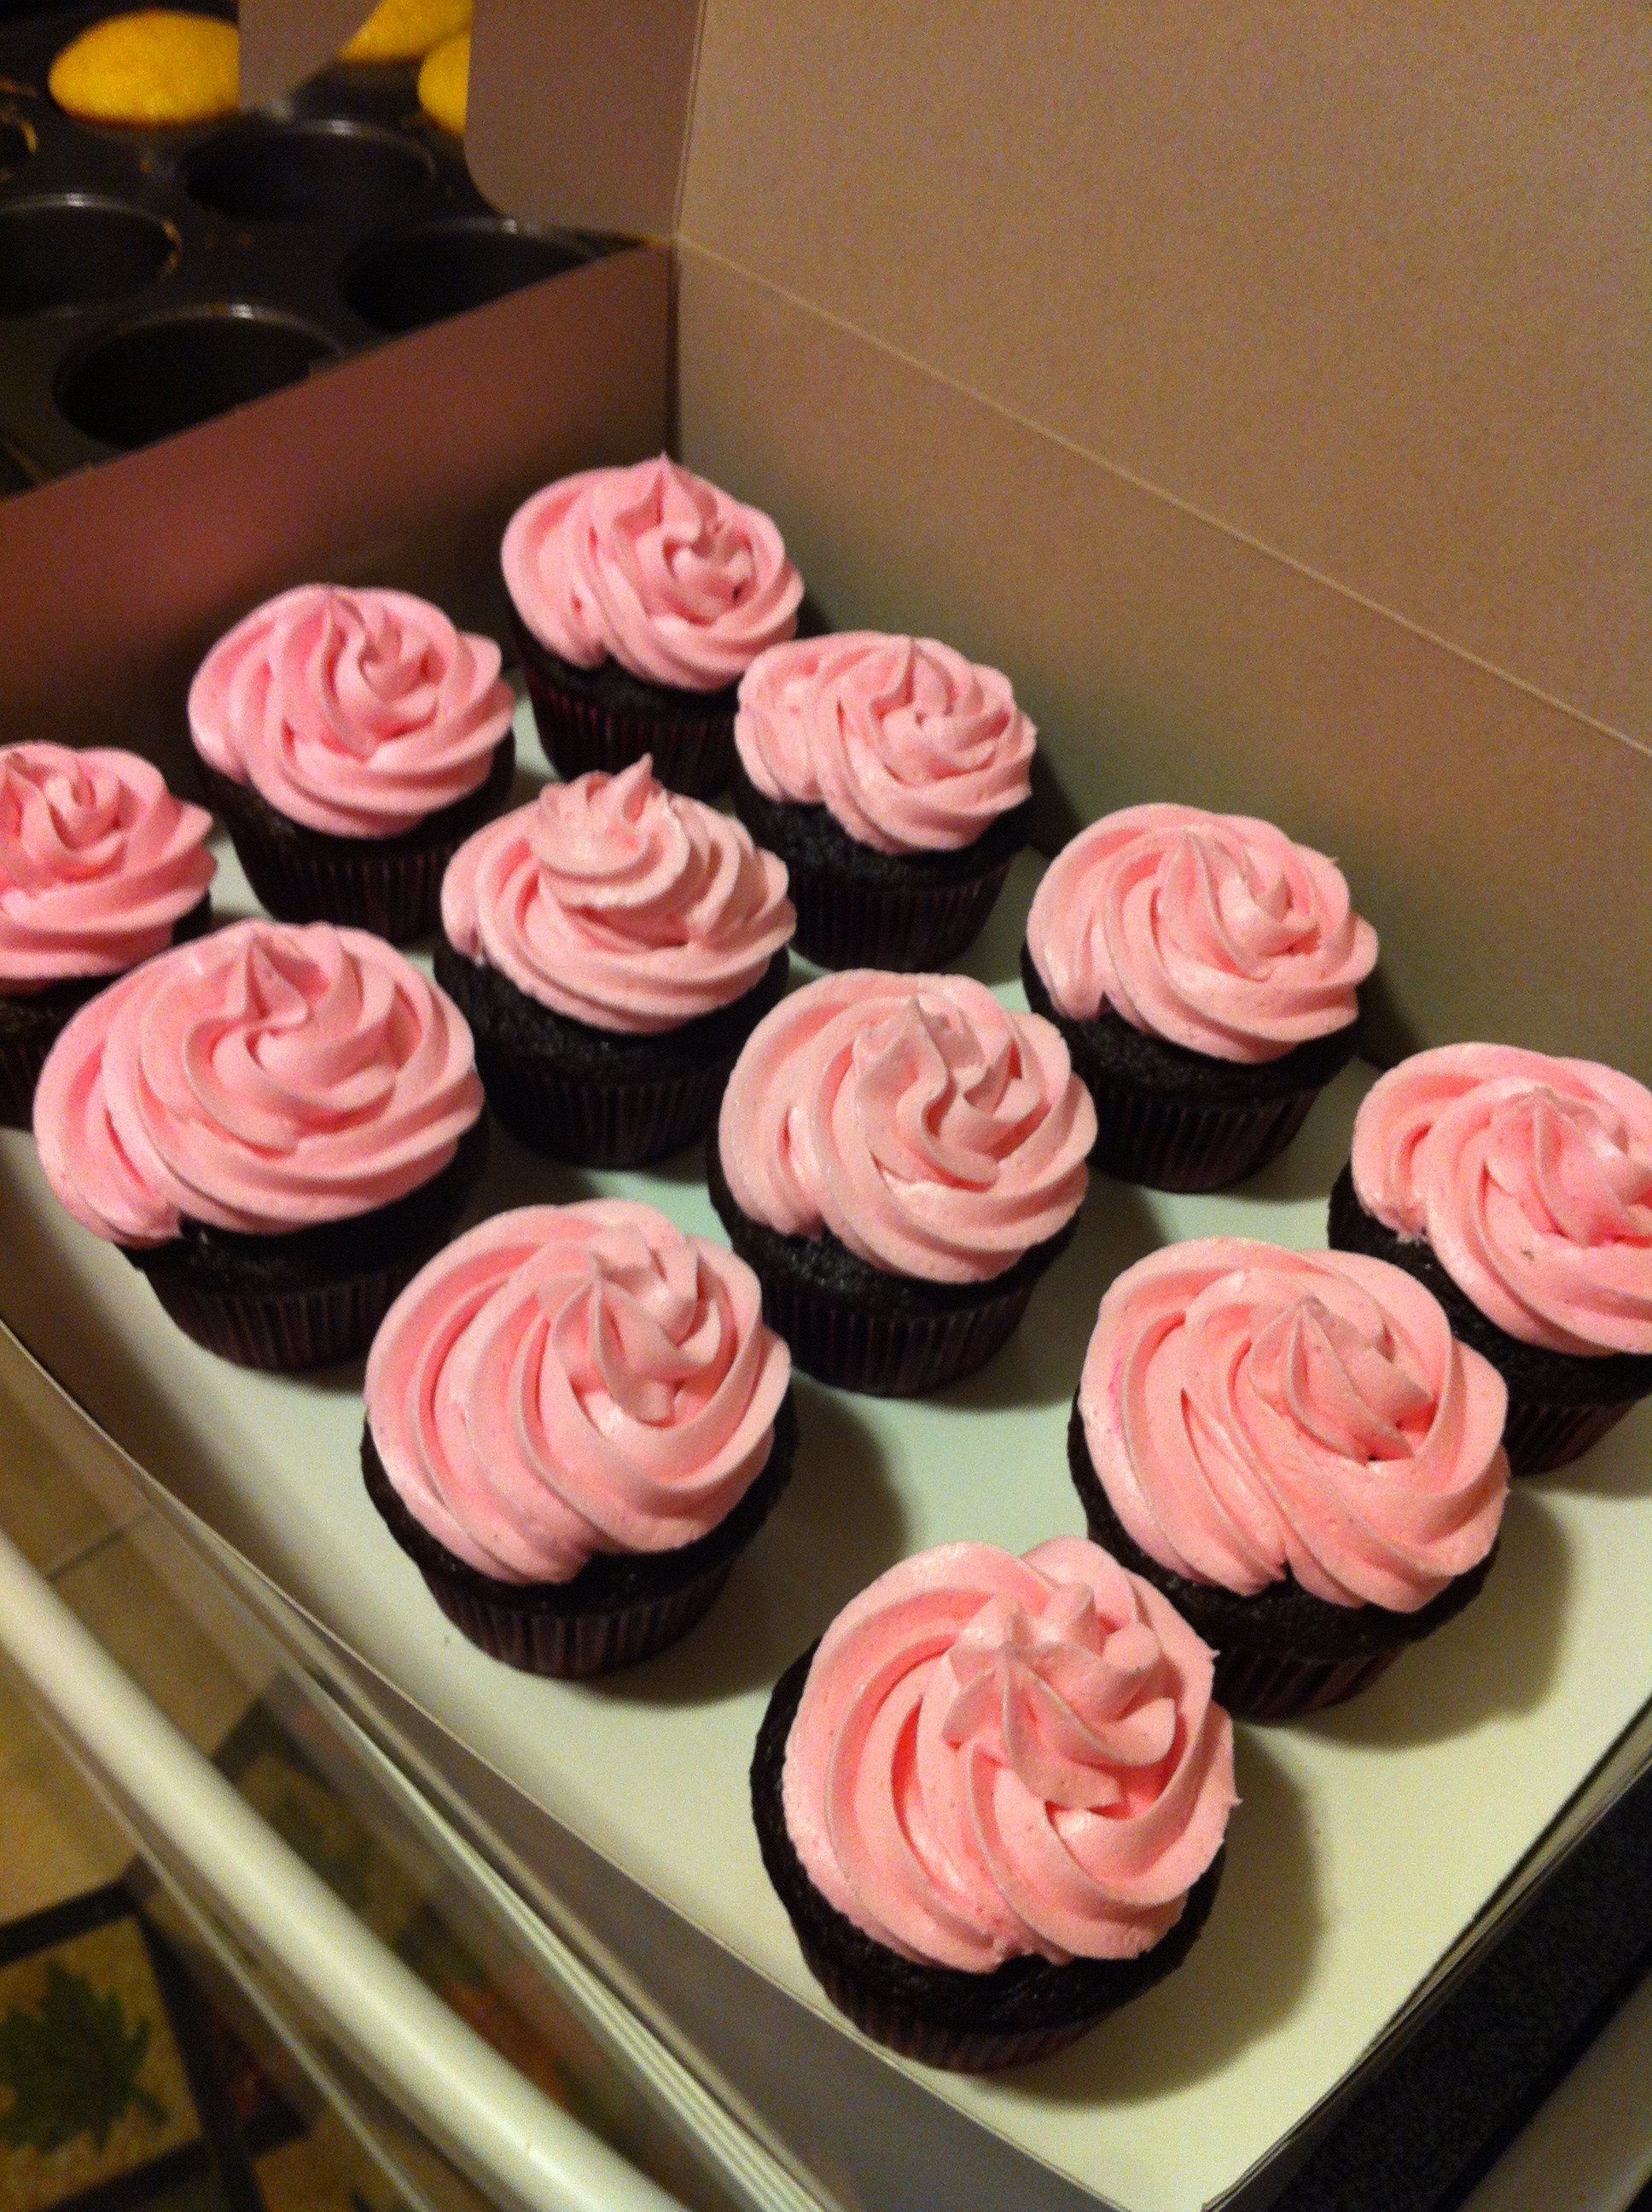
    As they baked, I couldn’t help but feel like these cupcakes were a lie of GLaDIOSian proportions. They certainly did make my house smell chocolatey.  Once they were out and frosted, I was really happy with how they looked. There was only one test they had left to pass.

    IMG_7706
    I brought them in to work the next day. Let me tell you, they were delicious. They were light and fluffy, not at all heavy like a traditional flourless cake. This peanut butter frosting is amazing; it’s definitely a recipe I’ll be using on other chocolate cupcakes.

    I would make one minor change to the entire process. I think it would work better to let the cupcakes bake about 5 minutes before putting the mini peanut butter cup in the center. As it was, they sank to the bottom instead of being stuck in the middle. Other than that, I couldn’t be happier with the outcome.


  2. Ava’s Hello Kitty Birthday

    November 2, 2013 by Daniora

    Kitty with a sugar pearl necklace.

    Are we glossing over the fact that I haven’t posted anything in over a year and a half? Yes, yes we are.

    My little buddy Ava turned 4 this spring. She wanted to have a Hello Kitty themed birthday. She asked her mom if Auntie Mimi would make her a Hello Kitty cake. Of course Auntie Mimi would make her a Hello Kitty cake.

    IMG_7239

    Since Ava is our little princess, a castle cake seemed to be the right answer. My girl loves pink too, obviously. Since there were going to be a whole bunch of people there, I went ahead and made some Hello Kitty cupcakes to go with it.

    Picture 433Picture 432

    While I’m not the biggest fan of Wilton’s fondant (the taste, mostly), there were two Wilton products that I fell in LOVE with.

    The first is one of their silicone fondant press molds (I used the global one). They’re super easy to use and make really beautiful impressions. All I did was loosely press a piece of fondant into the mold, then used a small plastic rolling pin to roll it flat into the mold. Once the excess fondant had been rolled out, I could just peel the pieces out of the mold and trim around the edges. Simple!

    Castle

    The basic castle shape. You can really see the details from the fondant mold.

    The other are their sugar pearls. They come in a variety of soft colors (I got pink, of course). They were the perfect flower centers and accents to my fondant pieces. I just pressed them into the fondant while it was still soft, and they stuck perfectly. A word of caution. They are roly poly and will get away from you if you let them.

    Perfect centers for flowers

    Perfect centers for flowers

    Picture 429

    Sugar pearls….. everywhere.

    Kitty with a sugar pearl necklace.

    Kitty with a sugar pearl necklace.


    In addition to the cake, because that’s never enough, I made a party dress for Ava.

    Ava's Party Dress

    Pretty in pink.

    It was my first time using the pre-smocked fabric. It was really super simple, but I don’t know that I’d do it again. It sort of feels like cheating. It’s really only one seam and sewing on the straps. It’s also fairly pricey, running around $0.50 an inch (I know that doesn’t sound like much, but it comes out to $18 a yard!) It did turn out pretty cute, though.  Of course, the attitude sells it.

    Attitude for days!

    Attitude for days!

    I love doing stuff for the kids’ birthdays. Any excuse for a celebration.


  3. Ava’s Pirate Birthday

    July 19, 2012 by Daniora

    One of the benefits to being “Auntie” to everyone’s kids while having none of my own is that I have the time to go completely overboard for birthdays and holidays. When my sweet, adorable girly Ava wanted to have a pirate birthday party, I was very excited. She is definitely a girl after my own heart.

    We just finished moving (well, are you ever really finished moving?) so I didn’t have the time or set up to do as many projects as I would have liked, but I did get to make Ava’s birthday cake.

    Finished Pirate Cake

    The finished cake. I wish I had put the sails a little higher, but I’m really happy with how cute it came out.

    I based it off a cake from the 2010 Wilton Yearbook. The original was just a square cake with wood texture with a whole bunch of little brownie pop pirates on it. Since there were going to be quite a few people, we used a store bought sheet cake as a base.

    Having a summer birthday myself and having watched the horn slide off a unicorn and Rainbow Brite’s castle sag in the heat, I wanted to make sure things were going to stand up to the sun. I made the square boat base out of Rice Krispy treats and covered them with brown fondant. I put in the wood texture and added the rails along the top.

    The little girl pirate figure is made entirely out of fondant. She weighs a ton. Her little curls were my favorite part, and most of them actually made it to the time the cake was served.

    So, while the cake was the biggest of my piratey projects, it wasn’t everything. After Brian and I picked out some sweet gifts, I couldn’t be happy just wrapping them in pirate wrapping paper (Target has a really cute one, though).

    Pirate Gift

    What’s better than a gift wrapped in pirate wrapping paper? A gift wrapped in pirate wrapping paper in a treasure chest, of course!

    I stained an unfinished treasure chest from Joann’s and put sticky felt on the bottom so it wouldn’t scratch their wood floors. Then I put in the wrapped gifts and put the whole shebang in a cellophane bag. When all was said and done, it really made quite an impact.

    Pirate Nails

    Ooh, sparkly!

    I also tried out those new Sally Hansen nail polish stickers. These were too perfect for me not to get! They went on almost as easily as the commercial would have you believe, and lasted for quite a while, even at work.

    Avast!

    Avast! Even Emma gets into it.

    I had so much fun at Ava’s pirate party. I even went in the bouncy house. Now I can’t wait for the next birthday party to come around.


  4. Sam’s Ork Birthday

    July 6, 2011 by Daniora

    Last month, one of my best friends, Sam, turned 30.  In honor of the occasion, we threw him an Ork birthday party.

    Ork Banner

    An Ork war banner I made. It would have been hanging outside had it not been pouring rain.

    Along with some of our other friends, Sam enjoys playing Warhammer 40k, especially Orks.  If I had to wager a guess, I’d say it’s more the attitude and less the gameplay that draws him to the green-skinned tide of destruction.

    For those of you not in the know, Warhammer 40k is a tabletop game played with miniature models of the different troops and vehicles.  You command your own army of miniatures, which you have lovingly assembled and painted, and march them across the table to victory or death.  Some games involve an objective but most are just a fight to the death. Combat is determined by a roll of the dice and he who rolls well wins.

    Ork Wartruk

    An Ork tank that I built and painted for Sam a few years ago.

    There are several different factions one can choose from when starting a Warhammer army.  There are the Space Marines, the insect like Tyranids, and the Chaos Daemons summoned from the great beyond to name but a few.  Sam plays Orks.  Orks are the greenest, fightingest, drinkingest army there is.  They believe that by painting a vehicle red, it will be able to move faster… and it works.  They speak with an over the top Cockney accent and any victory truly seems to come by luck rather than by ruthless military strategy.

    We had several small children in attendance, and for them I had made Grots Union t-shirts (Grots are little goblin-like creatures that the Orks use as slaves… and frequently ammunition). They were all members of Union Local 608, June 8th being Sam’s birthday.

    Grot shirt

    The Grots Union shirt, modeled here by Miss Ava.

    Because checkerboard patterns are a part of the Ork decoration, I was able to use some racing party supplies to augment the banner and pennants that I had made from scratch. The centerpiece of my Orky theme, however, was the cake.

    Ork Cake

    I’m not going to lie. I’m pretty proud of this one.  I’m not a huge fan of fondant, at least not from a taste standpoint, but I do enjoy using it. There are some things that buttercream and royal icing just won’t do. This time I also used the new Wilton icing sheets.  (I’ll do a whole separate post on that. Awesome new product!) By brushing the pieces of the icing sheet that I had cut out with metallic color dust, I was really able to get pieces that looked like metal. I found some fantastic candy rocks at a local shop. They’re actually very similar to M&Ms, just rock shaped. They looked great all piled together.

    Ork Cake DetailOrk Cake Detail

    One of the most exciting moments of the party for me was when people had to ask if the rocks and metal bits were edible. That was when I knew I had done a good job.

    For the interior, I decided to keep with the checkerboard theme using the Wilton Checkerboard Cake Pan Set. Instead of doing the traditional vanilla and chocolate checks, I opted to do the whole thing in vanilla, tinting half of the batter green. It was a pretty warm day when I baked, and the batter was a little runnier than I would have liked, so my checks were a little off kilter.  Fortunately, it fit right in with the Ork theme.

    Checkerboard Cake

    Checkerboard cake

    All in all, it was a terrific party.  I wish the weather had been better, both on the day of the party and while I was trying to decorate the cake. I have even more admiration for my mother who made my birthday cake every year in the middle of July without air conditioning. (Thanks, Mom.) There are plenty more nerdly birthday celebrations on the horizon, and I’m sure many of them will include more nerdly baked goods.