RSS Feed

‘Recipes’ Category

  1. Grilled chicken wings

    September 14, 2011 by Daniora

    In honor of the first weekend of the regular football season, we’re going to talk about one of the quintessential football snacks: chicken wings.

    Grilled chicken wings

    Cooking chicken wings without using a deep fryer is a time consuming and intensive process.  There’s a lot you have to do to make sure that the skin winds up crispy. Until recently, I followed Alton Brown’s method of first steaming the wings and chilling them uncovered in the refrigerator before roasting them in the oven. It’s a process that takes hours and hours, but ultimately you wind up with good results.

    This summer, I decided that we should try grilling the wings. Our local market, Butcher Boy, has marinated wings for sale, as well as big bags of plain wings. I picked up a package of teriyaki marinated wings for our first experiment. Those first results were a little hit and miss.

    The biggest problem we encountered was that there were a lot of flare ups on the grill from the chicken skin, and we didn’t have a spray bottle of water handy.  A rookie mistake, I know, but most of our other grilling hasn’t really required this sort of preparation. The second problem was that the wings stuck to the grill, especially with the marinade on it.  The flavor of the finished wings was good, but the teriyaki flavor really got lost.

    Grill Flare Up

    A spray bottle is a necessity to keep flare ups under control.

    Our second attempt yielded much better results. We started with plain wings, got some Pam for grilling and liberally sprayed down the grill before cooking, and coated the wings in sauce after cooking. Something about the char from the chicken mixing with the sauces really added a new level of flavor to the wings. I made two types of sauces, Alton Brown’s orange glazed wings and a basic buffalo (see below). Both were outstanding on the crispy skin (even though the char did turn the buffalo sauce a sort of muddy brown color).

    Grilling wings is still a fair amount of work.  It takes constant vigilance to combat flare ups and make sure that all the little wings get crispy and don’t stick to the grill.  It is, however, much faster than the steam-and-roast method and has much better results. Depending on the size of your grill, it can be a great way to cook up food for a large crowd.

    Basic Buffalo Sauce

    I’m not a huge fan of  very spicy buffalo wings. I avoid anything with the words “volcano” or “atomic”. I like them to have a bit of heat, but still retain a depth of flavor. You can substitute any hot sauce of your choice and increase the amount to your desired heat level.

    • 3 ounces unsalted butter
    • 1 small clove garlic, minced
    • 1/4 cup hot sauce (I prefer Frank’s)
    • 1/2 teaspoon kosher salt


    1.  Melt the butter in a small bowl along with the garlic.
    2. Pour melted butter and garlic, along with hot sauce and salt, into a bowl large enough to hold all of the chicken and stir to combine.
    3. Remove the wings from the grill and toss with the sauce. Serve warm with a side of blue cheese dressing if desired.


    As the season progresses, stay tuned for lots more football snacks and party ideas.


  2. Rotini with Sausage and Mushrooms

    May 16, 2011 by Daniora

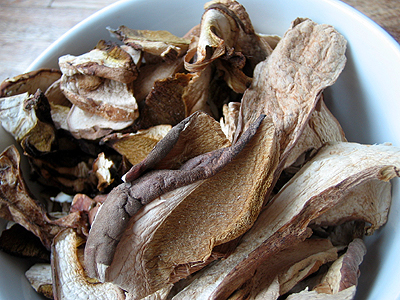
    Dried Porcini Mushrooms

    Dried Porcini Mushrooms

    This is the recipe that introduced me to porcini mushrooms.  They come dried and have to be reconstituted with hot water.  They have a fairly strong earthy flavor.  I use them in meaty pasta sauces and in mushroom and spinach risotto.  If you really don’t care for the porcini, you can make this using only the button mushrooms, but the recipe has a far better flavor depth if they’re included.  Since using Italian sausage in pasta sauces is so popular, you can usually find it without the casings at the store.  If you do have to remove the casings, all you have to do is use a sharp knife to slit the casing open and turn out the interior.

    Rotini with Sausage and Mushrooms

    1 ounce dried Porcini Mushrooms
    1 cup hot water
    1 tbs butter
    1 large onion, finely chopped
    1 1/4 pounds Italian sausage, casings removed
    1 pound button mushrooms, sliced
    ½ tsp dry rosemary, crumbled
    ½ cup dry, white wine
    1 bay leaf
    1cup beef stock, or canned broth
    11/4 pounds rigatoni pasta
    1 cup half and half
    11/2 cups freshly grated Parmesan cheese
    Salt and freshly ground pepper
    Chopped fresh Italian parsley
    Fresh rosemary sprigs
    Additional Parmesan cheese

    Rinse Porcini mushrooms. Place in small bowl. Pour 1 cup hot water over and let soak until softened, about 20 minuets. Drain porcini, reserving soaking liquid. Chop porcini, discarding hard stems. Set aside.

    Melt butter over medium heat in a heavy skillet. Add onion and cook until beginning to soften. Add sausage, increase heat to high and cook until just no longer pink, breaking up with a fork, about 6 minutes. Add fresh mushrooms and dried rosemary and stir until mushrooms begin to soften, about 5 minutes. Add porcini and wine and bay leaf and boil until all liquid almost evaporates, about 4 minutes. Add stock and porcini soaking liquid, discarding any sand at the bottom of liquid. Simmer until sauce is syrupy, stirring occasionally, about 15 minutes.

    Cook pasta and drain.

    Add half and half to sauce and boil until thickened slightly about 2 minutes. Add sauce and 1 1/2 cups of cheese to pasta and stir over low heat until coated. Season with salt and pepper. Transfer to platter and sprinkle with parsley.


  3. Simple Strawberry Jam

    April 27, 2011 by Daniora

    StrawberriesWe here at The Nerdly Home are all about making things from scratch whenever possible. That can be tough to do when things get busy. Fortunately, there are plenty of things that can be made ahead and stored for later. I’ve just started getting into canning, and I’ll admit that I haven’t quite gotten the hang of it. There always seems to be one little step that I forget and everything has to be stored in the fridge instead of on a shelf. I’m definitely improving, though.

    Since my canning skills are improving, I figured it was about time for me to start making things from scratch to put in the jars.  After going through the wonderful book Canning and Preserving with Ashley English (Homemade Living), I decided that her recipe for Strawberry Jam would probably be the simplest. In spite of the weather, it is spring.  Spring is the best time for strawberries. Just be sure that if you’re making anything with strawberries, be sure to get organic.  They cost a bit more, but strawberries are one of the dirty dozen foods that retain the most toxins from pesticides.

    Simple Strawberry Jam

    • 4 pints strawberries, hulled and sliced
    • 2 cups granulated sugar
    • 2 tablespoons bottled lemon juice


    1. Place two small plates in the freezer. These will be used later to test for gelling.

    2. In a large nonmetallic bowl, add the strawberries, sugar, and lemon juice; stir, cover loosely with a kitchen cloth, and set aside to macerate at room temperature for 2 hours.

    3. Sterilize 3 half-pint mason jars, lids, and screw rings. Fill a canner or large stockpot with water, and set over medium-high heat. Bring just to the boiling point. Place the lids in a small saucepan, fill with water, bring to a boil, turn off the heat, and set the pan aside.

    4. Transfer the strawberry mixture to a medium stainless-steel pot. Bring to a boil over medium-high heat and boil for 20-25 minutes, until the mixture begins to thicken. Stir frequently an watch the pot carefully to prevent to contents from boiling over. Skim off any foam that rises to the top.

    5. Test for gelling. Remove a plate from the freezer and spoon about 1 teaspoon of the strawberry mixture onto it. Place the plate back in the freezer and wait 2 minutes. Remove from the freezer and push the edge of the jam with your fingertip. If the jam has gelled properly, the surface will wrinkle a bit. If it fails to wrinkle, or is obviously still runny, boil the jam for 5 minutes longer, and then repeat the test.

    6. Place the hot, sterilized jars on top of a kitchen cloth on the counter. with the help of a canning funnel, ladle jam into the jars, reserving 1/4-inch headspace. Use a nonmetallic spatula to remove any trapped air bubbles, and wipe the rims clean with a damp cloth. Place the lids and screwbands, tightening only until fingertip-tight.

    7. Using a jar lifter, place the jars into the canner. Process for 10 minutes in a boiling bath.

    That’s it.  Simple ingredients and simple to make. The only major problem I had with making the jam was skimming off all the foam.  There was quite a bit of it and I really didn’t have a good tool for getting it all.  As a result, I wound up with some bits of foam in my jars compromising my canning.  So, all three jars went into the fridge.  I doubt the jam will be around long enough to risk spoiling.

    This jam is delicious.  I’m having a hard time not just grabbing the jar and a spoon and eating all of it. Because it doesn’t have any added pectin, it doesn’t set up quite as firm as commercially made jams.  Be sure to have a  napkin handy if you’re putting lots of this on your sandwich.  I’m looking forward to using it to make something tasty like danish or turnovers.


  4. Chicken Barley Corn Soup

    April 21, 2011 by Daniora

    We here at the Nerdly Home have been hit by one heck of a cold. As a result, posts have been delayed, and a large pot of chicken barley corn soup has been made. One of the fantastic things about this soup is that it can be easily adjusted to your personal tastes.  Want more vegetables? Add them.  Want to use left over chicken? Go ahead.  As a result, I won’t really put amounts on things unless they matter.

    Chicken Barley Corn Soup

    • 1 lb chicken, cut into bite sized pieces (can be leftovers)
    • garlic, minced
    • onion, finely diced
    • celery, finely diced
    • carrots, finely diced
    • 64oz (2 boxes) chicken or vegetable broth
    • 1/2c pearled barley
    • 1 can creamed corn
    • 1 bag frozen sweet corn
    • 1/2tsp-ish cumin
    • 1/2tsp-ish coriander


    1. In a large pot or dutch oven, heat a glug of olive oil.  Add garlic.  If using leftover chicken, skip this step. Add raw chicken until thoroughly cooked. I like to add some of the cumin and coriander at this point to help give the chicken some extra flavor, along with a bit of salt and pepper. When the chicken is cooked through, remove from the pot and set aside.

    2. Add a bit more olive oil if necessary and add the onion, celery, and carrots.  Add a small pinch of salt to help sweat the onions. Cook until softened, about 5 – 10 minutes.

    3. Add the cooked chicken and the rest of the ingredients back to the pot and bring just to the boil.

    4. Lower the heat and simmer until the barley is cooked, about 30-45 minutes.

    I find this soup is really fantastic with a nice warm piece of buttered Italian bread.  The soup can be made in large batches and is great for keeping in the freezer.